Showing posts with label SQL/Oracle. Show all posts
Understanding Microsoft SQL Server 2005 System Databases

Microsoft SQL Server 2005 System Databases
A database server application such as Microsoft SQL Server 2005 uses a lot of information in order to operate. Considering the purpose of a database is to store information, it only makes sense that SQL Server dips into its own technology for storing and accessing the information required for operating in a set of its own databases. Each of the databases used plays a specific role in the operation of the SQL Server. The system databases use the same components of databases created by users with: tables, views, stored procedures, and other database objects
Microsoft SQL Server 2005 uses five system databases:
- master – uses master.mdf for data and masterlog.ldf for logging
- model – uses model.mdf for data and modellog.ldf for logging
- msdb – uses msdbdata.mdf for data and msdblog.ldf for logging
- resource – uses mssqlsystemresource.mdf for data and mssqlsystemresource.ldf for logging
- tempdb – uses tempdb.mdf for data and templog.ldf for logging
A default installation of SQL Server stores all the system databases under
Here’s a Closer Look at Each System Database …
The master Database
The master database stores all the system-level information for SQL Server. The data stored by the master database includes information for: configuration settings, logon accounts, linked servers and endpoints, user database file locations, and properties. Due to the nature of the data stored, SQL Server cannot operate without the master database. So it is a very good idea to backup this database after changing the SQL Server configuration, modifying, adding, or removing any databases.
The model Database
SQL Server uses the model database for creating new databases. When the “create database” statement is used, SQL Server copies the contents of the model database to the newly created database. If there are any common database objects that would prove useful in all databases created by SQL Server, it is possible to add those objects to the model database. Then when a database is created by the SQL Server instance, the user defined objects will be copied to it along with the default objects. Since SQL Server recreates the tempdb database every time it is started, the model database is required in order for SQL Server to start. The msdb Database
The msdb database is used by SQL Server to store information on operations performed by SQL Server. This includes information for: the SQL Server Agent, Database Mail, the Service Broker, log shipping, backup, and maintenance plan job parameters. The resource Database
The resource system database was introduced with SQL Server 2005. This database is used for storing all the system views and stored procedures. Logically, each SQL Server database will contain all these system objects, however, they are physically stored within the resource database. The resource database is read-only and does not include any user data. In previous versions of SQL Server, the system objects were stored in the master database. The motivation behind moving the objects to a separate database is to make updating the SQL Server more efficient. Improvements and fix-ups to the SQL Server system generally manifest mostly on the system objects. A separate database to store the system objects reduces the number of files that need to be replaced with an update.
The tempdb Database
As the name implies, SQL Server uses the tempdb database for storing temporary data and data objects. The tempdb database is used when an operation requires a temporary table, stored procedure, or other database object to be performed. Intermediary data for large sort operations is also stored in the tempdb database as well as temporary data for internal SQL Server operations. Every time SQL Server is restarted, the tempdb system database is recreated thus clearing any temporary data stored during the last SQL Server session. In cases where a high volume of users and operations are performed with SQL Server the tempdb database can grow to use a significantly large amount of disk space. It is important to plan accordingly in these scenarios since running out of disk space where the tempdb database is stored will have catastrophic effects on the operation of SQL Server.
System Database Maintenance is Essential …
SQL Server’s system databases are crucial to the operation of SQL Server. If any of the system databases were to become corrupted, chances are SQL Server will no longer be able to function. For this reason it is just as important (if not more important) that you backup the system databases as regularly as the user databases. This applies to all the system databases except for the tempdb and resource databases. Users are restricted from performing many operations on the system databases such as: changing the database owner, dropping the guest user, or mirroring. The databases cannot be dropped or set to offline, nor do the database files support renaming.
Tag :
SQL/Oracle
TrainSignal Advanced SQL Server 2008 Database Administration

SQL Server 2008 Database Administration
If you want to develop hands-on experience as an SQL Server 2008 Administrator, or prepare for the 70-432 exam then this course is for you! We are excited to announce our long awaited SQL Server 2008 Administration Training course.
Download Links :-
DVD1
SQL Server 2008 Database Administration Part 2
SQL Server 2008 Database Administration Part 3
SQL Server 2008 Database Administration Part 4
SQL Server 2008 Database Administration Part 5
SQL Server 2008 Database Administration Part 6
SQL Server 2008 Database Administration Part 7
SQL Server 2008 Database Administration Part 8
SQL Server 2008 Database Administration Part 9
DVD2
SQL Server 2008 Database Administration Part 2
SQL Server 2008 Database Administration Part 3
SQL Server 2008 Database Administration Part 4
SQL Server 2008 Database Administration Part 5
Tag :
SQL/Oracle,
Train Signal
How to Create a Simple Backup Job in SQL Server

Create a Simple Backup Job in SQL Server
There are several ways to create a backup job in SQL Server 2008 and I’m going to show you how to create a very simple one for both a single database and for multiple databases. And since there are so many ways to do this, I’m going to briefly discuss most of them at the end of this article so you’ll have a good idea of what other options you have.
First you start by opening a query window in SSMS and connect to the server you want to backup. It’s worth noting that it doesn’t matter which database you’re connect to, but I typically do it from master just to be consistent.
The basic backup syntax that you need to type is here:
BACKUP DATABASE databaseName
TO DISK = 'file location'
OK, let me explain a couple of these items.
databaseName – this is the name of the database you want to backup.
To disk = 'file location' – Backups are written to files. This is the full path to the file. Typically, a full backup such as this one will have the extension of .bak, but that’s just what everyone does. It can have any extension you like or no extension at all if you like.
Now let’s see a real example with all of the values filled in. Here we’re going to backup the Model database to a file called ModelBackup.bak on C:\.
BACKUP DATABASE Model
TO DISK = 'c:\ModelBackup.bak'
backup database Model
To disk = 'c:\ModelBackup.bak'BACKUP DATABASE MODEL
To disk = 'c:\ModelBackup.bak'bacKup DataBasE ModeL To dIsk = 'C:\MODELBACKUP.BAK'
However, you don’t want to backup your database by hand every time so you want to schedule this to run on its own. And for this you’re going to put the above code into a job and schedule it. The easiest way to do this is to create a job in SSMS. Follow these steps to create the job and put your backup statement inside of it.
Expand the ‘SQL Server Agent’ tree and right-click on ‘Jobs’. Then choose the top item, ‘New Job…’

Now you’ve got the new job dialog box. Filling in the info is pretty easy. You need to give your job a name, and everything else is optional. Here I’m going to fill in the name of the job as ‘Backup user database’.

Next click on the ‘Steps’ pane on the left and you’ll be presented with this screen. It’s blank because you haven’t created any steps yet. So go ahead and click on the ‘New’ button at the bottom.

This is where the real magic happens. Again, you have to fill in a name so you know what the step is called. Make it something descriptive. There are several step types to choose from, but the default is T-SQL and since we’re running a T-SQL command that’s clearly the one we want to go with. The database defaults to ‘master’ and that’s just fine with us. Here’s what we have so far. You see the only thing we’ve had to do is fill in the step name.

The only thing left to do is to copy your backup statement into the query window. Of course it’s always a good idea to make sure your code will parse before you try to run it. Just click the ‘Parse’ button I’ve circled. Here’s what that looks like.

Now click OK and it’ll take you back to your new job window and now you’ll see your job step listed. And you can stack as many as you like inside there.
To schedule your job, just click on ‘Schedules’ on the left and then choose the schedule that’s right for you. It works similar to the the way it does in Windows so there’s really not much need for me to rehash it here.
Once you click OK all the way out until the new job box is closed, your job will be added to the job tree. You may have to right-click on ‘Jobs’ and refresh the display for it to show up.

Now that you’ve created the job to backup your database I’d like to go back to the command again and add one more part. See, when you backup a database to a file it won’t overwrite the file by default. By default it will append to the file, so your backup file will just get bigger and bigger. So what you want to do is add a special flag to the command that tells it to initialize (or overwrite) the file every time. That makes our backup command look like this
now:
BACKUP Database Model
With INIT
This is a good thing to keep in mind while you’re creating your job.
But what if you wanted to backup more than one database? Well, again, there are several ways to do this and I’m going to show you the easiest just to get you going.
There are 2 methods we’re going to discuss here:
1. In the job step you just created, you can just stack backup commands one after another. So the window that holds your backup code inside the step could easily hold the code for several databases. That would look something like this:
2. The other way you could do it is to add each one of your backup commands to their own step by repeating from step 3 above.
Here I’ve shown you how to create a simple backup job. Most tutorials will show you how to use the backup wizard, but that’s ridiculous because you’ll never do that in production. Nobody wants to manually backup their databases every day.
BACKUP Database Model
To disk = ‘c:\ModelBackup.bak’
This is a good thing to keep in mind while you’re creating your job.
But what if you wanted to backup more than one database? Well, again, there are several ways to do this and I’m going to show you the easiest just to get you going.
There are 2 methods we’re going to discuss here:
1. In the job step you just created, you can just stack backup commands one after another. So the window that holds your backup code inside the step could easily hold the code for several databases. That would look something like this:
2. The other way you could do it is to add each one of your backup commands to their own step by repeating from step 3 above.
Here I’ve shown you how to create a simple backup job. Most tutorials will show you how to use the backup wizard, but that’s ridiculous because you’ll never do that in production. Nobody wants to manually backup their databases every day.
Tag :
SQL/Oracle
How to Install SQL Server 2008

SQL Server 2008 is relatively easy to install, but it does take a little knowledge of the process and a little planning. For most shops the planning phase can be minimal but there will be instances (like clustering) when you’ll need to plan quite a bit. This will not be one of those cases. Today we’re going to discuss a straight-forward SQL Server 2008 install. Unlike some of the other Microsoft products there are a lot of screens to go through when installing SQL Server 2008, but most of them aren’t that bad. You just need to know what choices to make.
Before we walk through the screens and the choices you’ll be making, let’s go over a couple things you’re going to need to know before you get started. First of all you need to make sure your system meets the minimum requirements for the version of SQL Server 2008 you’re installing. That really isn’t very difficult these days but it’s best to check anyway.
You can find a list of the minimum requirements here.
Assuming that you’ll be installing this on a production system it’s important to know that there is at least one system reboot required for this install. That’s because the first thing this install will do is upgrade your version of Windows Installer to 4.5. If you’ve already got Windows Installer 4.5 then setup will not require the reboot. Next it will install version 3.5 of the .Net framework. On most boxes this shouldn’t require a reboot. I tell you this because if you’re installing SQL Server 2008 on a current production box that, then you’ll need to plan ahead for the reboot and perhaps do it a few days before you install SQL Server 2008 so you’ve got it out of the way when the time comes.
Now that we’ve taken care of the preliminaries, let’s install SQL Server 2008.
- The media will autorun and present you with this screen.

Notice how much info Microsoft gives you right away. Over on the left there are menu choices and the options on the right change as you go through the menus. You want to click on the Installation menu on the left to be presented with this screen.
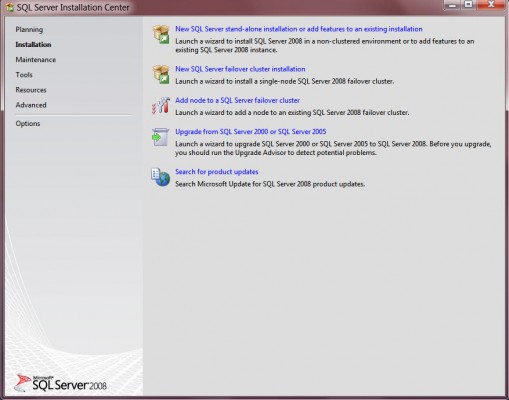
2. You can see there are many options here, but in this case the only one that makes sense is to click the top option for a stand-alone install. Click that option.
3. Once you choose the stand-alone install, setup will install the setup support files. It does this every time you run the installer so don’t be surprised if you run it again and again and it installs them every time. At this point setup will also run some checks to make sure that your system is ready to run through the install process. If it’s not and something fails, you’ll see an error similar to the one below. In my case I have a reboot pending and setup will not continue until I reboot.

 I might also add that if you have to reboot, once your server comes back up setup should continue on its own and re-run this check and if all errors have been eliminated, it should present you with the above screen just as if there had never been a problem.
4. Click OK. Next you will be presented with the setup support rules page. This is another set of checks that tells you whether things will complete and work properly once setup completes. The screen looks like this.
 And again, warnings can be ok, but if there are any errors you’ll need to resolve them before moving forward. I’ll talk more about the kinds of things that can go wrong with setup in another article.
5. Now it’s time to choose the installation type. Are you installing a new instance of SQL Server 2008, or adding to an existing instance?


3. Once you choose the stand-alone install, setup will install the setup support files. It does this every time you run the installer so don’t be surprised if you run it again and again and it installs them every time. At this point setup will also run some checks to make sure that your system is ready to run through the install process. If it’s not and something fails, you’ll see an error similar to the one below. In my case I have a reboot pending and setup will not continue until I reboot.

If you don’t have any problems with the checks, the screen will be all green like this:

4. Click OK. Next you will be presented with the setup support rules page. This is another set of checks that tells you whether things will complete and work properly once setup completes. The screen looks like this.

5. Now it’s time to choose the installation type. Are you installing a new instance of SQL Server 2008, or adding to an existing instance?

6. Now enter your product key if you need to. There are times when it’ll be filled in automatically for instance if you’re installing an MSDN version.

7. Next you need to agree to the license terms. For the sake of completion I’m going to go ahead and say that you should read all of the license terms so you know what you’re agreeing to. However, assuming you agree and actually want to install SQL Server 2008, then check the box and click next.

8. This is one of those really important parts of the installation: choosing features to install. Unfortunately, since I don’t know your goal I can’t really offer very much guidance here, but I can tell you that you’ll need to install Database Engine Services at a minimum if you want to run a SQL Server 2008 database on the server. Everything else is optional, but it is a good idea to install the documentation and the management tools. If you’re not sure whether you should install a feature or not there are two bits of advice I can offer. First, as you click on each option, a description comes up in the right pane that tells you what it’s all about so that can help you decide. And second, installing everything won’t hurt your server so if you’re not sure, then it’s cool to go with a full install. It’s still always best to snipe the features you’re after though.

You’ll notice that some features are grayed out. This is because I’ve already got SQL Server 2008 installed on my box, and some features can only be installed once across all instances. It doesn’t do any good to install multiple copies of the documentation, for example.
9. This next screen allows you to define whether you want to install a default or a named instance. You can of course only install one default instance, and all others must be named. As you can see here, I’m installing a named instance because I’ve already got a default instance on my box.

10. This screen outlines the disk space requirements for all the options you’ve chosen. There’s nothing really to do here and I’ve never seen it fail since nobody puts a database on a server that can’t even hold the install.

11. Now you need to configure your service accounts. You can select the same account for all services or separate them into different accounts. And while detailed advice on that is beyond the scope of this article, I can say that either way is usually ok. The one piece of advice I can give you though is to make it a domain account instead of just a local Windows account. And there are special permissions that these accounts need so you should make sure they have those rights. For a detailed discussion on choosing authentication methods,

12. This screen takes a little explanation. It’s asking you which security model you want to run. It defaults to Windows authentication which should be fine for most shops. The deciding factor is whether you’ve got non-windows domains, or if you’ve got regular windows domains that don’t trust each other. This could be a situation where you’ve got external customers hitting your database and you don’t want to give them windows access, but rather access through some sort of portal. All the same, it’s best to use Windows authentication if your users have Windows accounts. It’s more secure and it’s easier for the users to connect to the database. This screen also wants you to define default data directories. You can change these at any time once SQL Server 2008 is installed, so you can just accept the defaults here if you like and then change it later if you need to.

13. This screen gets overlooked by a lot of people. It’s really a good idea to check both of these boxes. There’s absolutely no personal or identifying information sent to Microsoft and checking these boxes allows them to get automatic error and usage information so they can improve the product. And contrary to popular belief, they actually do look at every error report that comes across. So check both of these. It costs you nothing and it helps improve the product.

14. You’re going to learn to hate this screen. Here we have another set of checks that can stop your install and in my experience, most of the stuff that’s going to stop you will happen here… after you’ve already been through most of the screens. This topic is too detailed to go into right now, but just know that you can expect some showstoppers here if there are going to be any. The good news is that you mostly get stopped on upgrade so if you’re installing a fresh instance you’ll probably be ok. So once you get all greens you can go ahead.

15. Assuming you’ve made it this far you should be free to hit the Install button. There’s nothing really notable about this screen; it’s just a summary of all the options you’ve chosen. If you like you can look it over and to make sure that you didn’t do anything stupid, but I’m usually ready to just start installing at this point so I just bull on ahead.

OK, you’ve just gone through the setup wizard to install SQL Server 2008. As you can see it’s fairly straight-forward but there are a lot of screens to click through. This is a much bigger topic than I could ever cover in a single article, but starting with a simple wizard-driven install is a good place to get your feet wet. In later articles I’ll go into more detail on many of these aspects and even get into upgrades, and troubleshooting install errors.
Tag :
SQL/Oracle
Safe3 SQL Injector – Automatic Detection & Exploitation Of SQL Injection Flaws

Safe3 SQL Injector
Safe3 SQL Injector is one of the most powerful penetration testing tool that automates the process of detecting and exploiting SQL injection flaws and taking over of back-end database servers.
Features
Features
- Full support for GET/Post/Cookie Injection
- Full support for HTTP Basic, Digest, NTLM and Certificate authentications
- Full support for MySQL, Oracle, PostgreSQL, MSSQL, ACESS, DB2, Sybase & Sqlite
- Full support for Error/Union/Blind/Force SQL injection
- Support for file access, command execute, IP domain reverse, web path guess, md5 crack etc.
- Super bypass WAF
Download Here >>>
Tag :
SQL/Oracle,
Tips and Tricks
Tag :
SQL/Oracle