
Wireless Encryption on a WLAN
Wireless Router Configuration
Configuring the wireless security on a router can vary from router to router but the general options are the same. There are three main security options that typically are supported on modern routers, these include (listed from least to most secure):
- Wireless Equivalent Privacy (WEP)
- Wi-Fi Protected Access (WPA)
- Wi-Fi Protected Access2 – IEEE 802.11i (WPA2)
WEP typically requires that a key be entered on the router that will also be configured on the endpoint wireless devices. Routers that support WPA and/or WPA2 typically support two modes of operation: Personal Mode and Enterprise Mode. Personal Mode utilizes a passphrase (Pre-Shared Key – PSK) that is entered at both sides and is used to encrypt the connection. Enterprise Mode utilizes a connection to a remote authentication server which governs access onto the wireless network.
This article takes a look at the configuration of WPA2-Personal configuration on a Linksys WRT610N router. This router supports only WPA2 (with the current firmware) and this is the configuration that will be shown.
Configuring a Linksys WRT610N Wireless Router
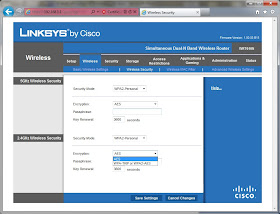
The first step is to log in to the router and to click on the Wireless option and from here navigate to the Wireless security tab; the Wireless Security tab screen is shown in figure

Wireless Security Tab Screen
On this screen, we are able to choose the security mode that is being configured. On this router WEP, WPA and WPA2 are supported; these options are shown in Figure

Wireless Security Modes
As stated previously, we will focus on the configuration of WPA2-Personal. Once the WPA2-Personal security option has been selected, what type of encryption to use needs to be determined. The two options on this router include:

As shown in Figure , there are two networks that are within range of this Windows 7 computer; when a specific wireless network is selected the option to connect is offered. If the connection is to be repeatedly used, a wireless network can also be set up to connect automatically.
Once the connect button has been selected, a dialog will be shown indicating the device is getting information from the wireless router; this dialog is shown in Figure


- Temporal Key Integrity Protocol (TKIP)
- Advanced Encryption Standard (AES)

Wireless Encryption Options
Once the encryption option is selected, a passphrase is entered which is also used by the wireless client devices; typically it is best that this passphrase is complex.
Windows 7 Wireless Configuration
When configuring a wireless connection on a Windows 7 machine, there are two different methods that can be used to set up the connection and choose an encrypting method. The first connection uses the parameters transmitted from an existing wireless router and the second connection is configured in preparation for a future connection to a wireless router and requires some additional configuration. Let’s take a look at both.Connecting to a Broadcasting Wireless Router
When a wireless network is broadcast from a wireless router and within range of a Windows 7 computer it is shown as a System Tray option, as shown in Figure
Available Wireless Networks
Once the connect button has been selected, a dialog will be shown indicating the device is getting information from the wireless router; this dialog is shown in Figure

Getting Information Dialog
In this example, the wireless router has already been configured with a passphrase (security key). The dialog shown in Figure 6 will be displayed asking for this passphrase to verify permission to connect to the wireless network. When using this method of wireless network connection, the specific security mode is automatically gathered with the initial connection to the wireless router.

Passphrase Entry Dialog
Once the client has connected to a wireless network, it will be displayed in the System Tray; this is shown in Figure

Connected Wireless Network
Configuring a Non-Local/Not Broadcasting Wireless Network connection
The second method that is used to configure a wireless network connection is to manually configure a device to connect to a specific wireless network that is either not local or is not broadcasting. The intial setup for this type of configuration is to goto the Network and Sharing Center; this is shown in Figure

Network and Sharing Center
From this screen, the Manage Wireless Networks option in the upper left corner needs to be selected; this will bring up the screen shown in Figure

Manage Wireless Networks
From this screen, a Windows 7 device can be configured to support a number of different wireless networks. To configure a new network select the Add option; once this is selected the screen shown in Figure 10 will be displayed.

Add a Wireless Network
Once this screen is displayed, select the option to Manually Create a Network Profile; once this is selected the screen shown in Figure 11 will be displayed.

Manual Wireless Connection Options
Once this screen is displayed, the wireless network name and security settings will be configured; the available security type options are shown in Figure

Manual Wireless Connection Security Type Options
The settings that are configured on this screen must match those already configured on the connecting wireless router or a connection will not be established. Windows 7 supports all of the available wireless security types and can be configured to connect to any standard router.
supper
ReplyDelete