Archive for January 2014

Computing Measurement Units ...


Our storage future ... 

1 Bit = Binary Digit
8 Bits = 1 Byte
1024 Bytes = 1 Kilobyte
1024 Kilobytes = 1 Megabyte
1024 Megabytes = 1 Gigabyte
1024 Gigabytes = 1 Terabyte
1024 Terabytes = 1 Petabyte
1024 Petabytes = 1 Exabyte
1024 Exabytes = 1 Zettabyte
1024 Zettabytes = 1 Yottabyte
1024Yottabytes = 1 Brontobyte
1024 Brontobytes = 1 Geopbyte
1024 Geopbyte=1 Saganbyte
1024 Saganbyte=1 Pijabyte
Alphabyte = 1024 Pijabyte
Kryatbyte = 1024 Alphabyte
Amosbyte = 1024 Kryatbyte
Pectrolbyte = 1024 Amosbyte
Bolgerbyte = 1024 Pectrolbyte
Sambobyte = 1024 Bolgerbyte
Quesabyte = 1024 Sambobyte
Kinsabyte = 1024 Quesabyte
Rutherbyte = 1024 Kinsabyte
Dubnibyte = 1024 Rutherbyte
Seaborgbyte = 1024 Dubnibyte
Bohrbyte = 1024 Seaborgbyte
Hassiubyte = 1024 Bohrbyte
Meitnerbyte = 1024 Hassiubyte
Darmstadbyte = 1024 Meitnerbyte
Roentbyte = 1024 Darmstadbyte
Coperbyte = 1024 Roentbyte
Friday, January 17, 2014

System Center 2012 Configuration Manager SP1 and Windows Intune - Setting up the Windows Intune Subscription

System Center 2012 Configuration Manager SP1 and Windows Intune - Setting up the Windows Intune Subscription

This is a post in a series of posts on Windows Intune and the new integration capabilities found in System Center 2012 SP1 Configuration Manager.  The other posts can be found here.

This post will show you how to establish a connection between Configuration Manager and your Windows Intune subscription.

  • Start by navigating in the Configuration Manager console to Administration > Hierarchy Configuration
  • Select the Windows Intune Subscription node in the tree and either Right Click and choose Create Windows Intune Subscription or click on the button of the same name in the Ribbon

  • Create Windows Intune Subscription Wizard window will open, review the Getting started information and when ready Click Next.

    The main thing to ensure you have before continuing any further is the account username and password for an account with Service Administrator rights to your Windows Intune subscription.

  • Click Sign In and supply the credentials to Windows Intune on the sign in page


  • When you've been authenticated, the option that was greyed out on screen becomes selectable.

    Be sure to read and understand this bit fully.

    Once you set Configuration Manager as the mobile device management authority, it cannot be undone.  You cannot decide later on down the line to back out and return to managing mobile devices just purely through Windows Intune so choose wisely.

    Once you're happy with this "no going back" idea, Tick the Allow the Configuration Manager console to manage this subscription and then Click Next.
  •  Click the Browse button next to the Collection line to choose a collection containing theUsers known to ConfigMgr that will be enabled to allow enrolling their mobile devices for management.

    You may want to nip back to the ConfigMgr console and create a new collection to manage these users if you haven't done so already.
  • Enter some basic information into the next section of the wizard to brand the portal users will see.
  • You can only assign a single site to manage mobile devices, I'd recommend choosing a site with a good internet connection.
  • Click Next.
  • On the Platform section of the wizard you can either choose to enable the different types of platforms you want to manage or skip past this part and configure them later.

    If you choose to configure them at this point be sure you're aware of the requirements needed for each and are ready with accounts such as your AppleID to request and download the required certificates.
  • In this example I choose to configure them later and skipped past by just Clicking Next.

  • Review the Summary screen and Click Next to initiate the configuration of Windows Intune to be managed via ConfigMgr.

  • Fingers crossed all goes smoothly and you'll be presented with the Completion screen soClick Close.

  • Last thing to do is navigate in the Configuration Manager console to Administration > Site Configuration > Sites
  • Select an site and Click Add Site System Role in the Ribbon
  • Step through the wizard and on the System Role Selection screen Tick the box to choose the Windows Intune Connector role and then finish stepping through the Wizard.
 
 
If everything went smoothly you should now have Windows Intune mobile device management configured to be managed via System Center 2012 SP1 Configuration Manager!
Saturday, January 11, 2014

Microsoft Private Cloud, System Center 2012 and License Changes

Microsoft Private Cloud, System Center 2012 and License Changes


http://www.microsoft.com/business/events/en-us/PrivateCloudExec

Today Microsoft announced a change in the licensing for System Center.
The multiple SKUs and versions have been greatly simplified down to just 2 (yes that's just TWO!!) offerings.

That's a big change from currently the four different licensing schemes, Datacenter, Enterprise, Single Enterprise, and Single Standard.

The new license types are:
System Center Standard - Manage a physical server, or very lightly virtualised (2 VM's)
System Center Datacenter - Manage unlimited VM's on a physical host

Both the System Center license types contains the following products:
  • Configuration Manager
  • Service Manager
  • Virtual Machine Manager
  • Operations Manager
  • Data Protection Manager
  • Orchestrator
  • App Controller
  • Endpoint Protection 
So no more individual license for each product, it's a suite license only.

Another couple of major changes....
Licences are now only needed for endpoints being managed, no management servers or SQL licensing. (Yep, you heard it right, SQL licenses for the SC Management Servers is now included in the new licenses)

Both types (Std & DataCenter) are both processor based Licenses, but covers up to two processors per license.


There is also a transition model from the old licensing model to the new.

If you have Software Assurance coverage on your current System Center licenses at the time of System Center 2012 General Availability, you will receive the following System Center 2012 Server ML grants at the ratios listed below:


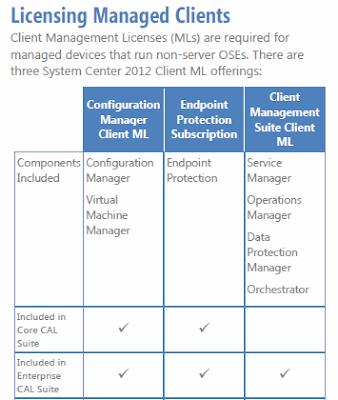
That covers off licensing Server Operating Systems, however for the Configuration Manager and Service Manager parts of System Center for example, you still require Client Management Licenses for non-server OSE's


Microsoft also have a useful interactive site online that can provide some common scenario questions about System Center 2012 licensing:
http://www.microsoft.com/licensing/about-licensing/SystemCenter2012.aspx


Just to pre-empt the most likely couple of questions likely to get asked around this:
Q) Are there separate offerings without SQL Server Technology?
A) No. All System Center 2012 products include the right to run a runtime version of SQL Server Technology to support System Center so there are no longer separate offerings.

Q) Do I need to purchase separate Management Server Licenses to run Management Server software?
A) No. With System Center 2012, the right to run Management Server software is included with the Server MLs and Client MLs.

Further information:
System Center 2012 Licensing Datasheet

System Center 2012 Licensing FAQ

Chat Using Command Prompt

To Chat Using Command Prompt Perform the following Steps

Step1-You would require the IP Address of the person you wish to chat.

Step2-Open Your Notepad and type the  following code.

@echo off:
A
Cls
echo MESSENGER
set /p n=User:
set /p m=Message:
net send %n% %m%
Pause
Goto A3.


Step3-Now save this code as "Messenger.Bat".

Step4 -Drag this file(Messenger.Bat file) over the command prompt and press Enter.

Step5-You would then see something like this:

MESSENGER
User:

Step6:Next to user type the IP Address of the computer you wish to contact.

Step7-Now all you need to do is press "Enter" and start chatting.


Note-This Works only With a Lan Connection.This might not Work in Vista and Windows7
Wednesday, January 1, 2014

Pageviews

Followers

Powered by Blogger.

- Copyright © 2013 Selva Sharing -Selvasharing- Powered by Blogger - Designed by @ Access -