Archive for September 2011
How to Setup a FTP Server in Windows 7
In Windows 7, you can share files on home network easily using Home Group but creating an FTP server gives you many benefits. The FTP can also be accessed by other Operating Systems in the network, You can also configure it to be accessed from anywhere through internet. In this short tutorial, I will guide you to make an FTP Server on Windows 7 for LAN.
If your IIS is already installed then start from step 4.
Step 1
Open control panel and then click on Programs.
Step 2
In Programs, click on Turn Windows features on or off.
Step 3
After clicking Turn Windows features on or off you will see a new window. Find Internet information Services and mark check on it and then click OK button.
Use the FTP Site Wizard to Create an FTP Site With Anonymous Authentication
In this section you, create a new FTP site that can be opened for Read-only access by anonymous users. To do so, use the following steps:
1. Go to IIS 7 Manager. In the Connections pane, click the Sites node in the tree.
2. Right-click the Sites node in the tree and click Add FTP Site, or click Add FTP Site in the Actions pane.
3.When the Add FTP Site wizard appears:
1.Enter "My New FTP Site" in the FTP site name box, then navigate to the "%SystemDrive%\inetpub\ftproot" folder that you created in the Prerequisites section. Note: If you choose to type in the path to your content folder, you can use environment variables in your paths.
2.Click Next.
4.On the next page of the wizard:
1.Choose an IP address for your FTP site from the IP Address drop-down, or choose to accept the default selection of "All Unassigned." Because you will be accessing this FTP site remotely, you want to make sure that you do not restrict access to the local server and enter the local loopback IP address for your computer by typing "127.0.0.1" in the IP Address box.
2.You would normally enter the TCP/IP port for the FTP site in the Port box. For this walk-through, you will choose to accept the default port of 21.
3.For this walkthrough, you do not use a host name, so make sure that the Virtual Host box is blank.
4.Make sure that the Certificates drop-down is set to "Not Selected" and that the Allow SSL option is selected.
5.Click Next.
5.On the next page of the wizard:
1.Select Anonymous for the Authentication settings.
2.For the Authorization settings, choose "Anonymous users" from the Allow access to drop-down. Select Read for the Permissions option.
3.Click Finish.
6.Go to IIS 7 Manager. Click the node for the FTP site that you created. The icons for all of the FTP features display.
Click finish and you are done. You can now access this local FTP server from any other node of your local network. In my case the URL for the FTP is ftp://127.0.0.1
Access Files on your Computer from Anywhere
The problem: You have documents, photos, music and other important files on the home computer. How can you “remotely access” these files from your office computer or, when you are travelling, from your mobile phone?
The solution: The simplest solution would be that you copy all your data from the home computer on to a portable hard drive and carry it around but this is obviously a bit cumbersome approach as it requires you to manually sync the home computer and your portable disk.
Access Files on your Computer over the Internet
There are couple of ways by which you can retrieve files stored on your home computer from anywhere else using a regular Internet connection.
Option 1: Using Online Backup
You can use an online backup service like SugarSync, Carbonite, SkyDrive or even Dropbox – they provide desktop utilities that will automatically upload files on your home computer to the Internet and you can then access these files through the web browser of any other Internet connected computer.
The upside is that your files will always be available to you even if the home computer is not running. SugarSync and Carbonite have a mobile optimized website so you can access files from any mobile phone as well.
The downside is that if you are using any of these services for the first time, you’ll to wait until they upload all your data to the cloud and this process may take long if you have too many files on the home computer.
Option 2: Using Desktop Sharing Software
There are free desktop sharing software like TeamViewer and UltraVNC that also let you remotely access your computer files from anywhere else. LogMeIn Pro and CrossLoop Home are some other good options for transferring files from a remote computer but these are paid services.
If all your computers are running Windows, you can use the built-in remote desktop connection feature of Windows (available in XP and later) to access your home computer from another Window computer over the Internet.
With Desktop Sharing software, you’ll always have access to all your files but one big limitation is that it requires that the remote computer stays on. Also, none of these options will help you access files on a mobile phone except LogMeIn which has an iPhone app.
Option 3: Access Files Directly through the Browser
Online backup services, discussed above, will copy files to their own servers before you can access them for anywhere else. Screen sharing services are often slow and they won’t work on most mobile devices. Let’s now explore another set of services that allow you download files directly from the home computer.
Copernic, like Google Desktop, is a popular desktop search software that you may use to find emails, documents and other files on your Windows computer. They have a paid component called myCopernic on the Go that lets you remotely search for content stored on the home or office computer. You can preview the search results and then download them to your mobile phone or remote PC.
With Opera Unite, you can easily turn your computer into a web server and instantly access files and folders on that computer from any other web browser (including that of mobile phones). Opera Unite is a standard web server and therefore you’ll be downloading files directly from the computer – they’re not uploaded anywhere else.
Another option is GBridge that lets you setup a virtual private network using your existing Google Account. Companies use VPNs to let employees access corporate data over a public network (Internet) and with GBridge, even home users can build their own VPNs to access remote files more securely.
Windows Live Sync at sync.live.com is another great choice for remotely accessing files over the Internet. Just install the Live Sync client on your computer and you can then access the entire hard drive of that computer simply through the Windows Live Sync website.
Live Sync is available for both Mac and Windows. The new version of Live Sync is even better and it has integrated online storage (Live Mesh) so you’ll be able to access your important file even if the remote computer is off.
Finally, you may also want to check out HomePipe – this is an extremely easy and free service that lets you access your home files and media from any other computer or mobile phone. Install the HomePipe Agent and all files on that computer will instantly become available through the web. They also have apps for iPhone and Android phones.
Tag :
Tips and Tricks
A World Map of the Undersea Internet Cables
A Wikipedia entry states that only 1% of Internet data and voice traffic is transmitted through satellite links while the remaining 99% is still carried by undersea cables spread across the world’s oceans. This explains why Internet services get disrupted when these undersea cables are damaged due to passing ships or in the event of an undersea earthquake.
You should also check the recently updated Submarine Map which gives some good idea about the physical routes of these cables lying under the sea bed. This is an interactive map so you can zoom-in or click on any particular colored cable to know about their respective owners. Fascinating stuff.
You should also check the recently updated Submarine Map which gives some good idea about the physical routes of these cables lying under the sea bed. This is an interactive map so you can zoom-in or click on any particular colored cable to know about their respective owners. Fascinating stuff.
Tag :
Info
Security Certified Network Professional (SCNP) – Strategic Infrastructure Security (SIS) Training.

Security Certified Network Professional (SCNP) – Strategic Infrastructure Security (SIS) Training
4.25 GB.
It will give a network administrator the additional hands on skills needed to protect their network from the inside out. This course teaches you about prevention techniques as well as giving the candidate an understanding of risk analysis and security policy creation in a blended technology environment. The up-to-date security lessons and intense, hands-on labs bring a real world network security to training candidates.
The is the official training for the SCNP exam and is designed to validate the foundational skills required by security professionals. These skills include, but are not limited to: Cryptography, Hardening Linux Computers, Hardening Windows Computers, Ethical Hacking Techniques, Security on the Internet and World Wide Web, Performing a Risk Analysis, Creating a Security Policy and Analyzing Packet Signatures. Strategic Infrastructure Security replaces Network Defense and Countermeasures with updated technology and intense, hands- on labs.
Download Links :-
Security Certified Network Professional (SCNP).Part1
Security Certified Network Professional (SCNP).Part3
Security Certified Network Professional (SCNP).Part4
Security Certified Network Professional (SCNP).Part5
Security Certified Network Professional (SCNP).Part6
Security Certified Network Professional (SCNP).Part7
Security Certified Network Professional (SCNP).Part8
Security Certified Network Professional (SCNP).Part9
Tag :
Networking
Cisco Live (2011) Slides Ebooks Collection

Cisco Live (2011) Slides Ebooks Collection (2.57 GB)
Cisco Live’s first ever “Industrial Intelligence Day” focusing on manufacturing and industrial customer needs was judged a great success according to the feedback given at the sessions in Las Vegas this week.
In an action packed day attendees heard about trends in network convergence between business IT and Industrial plant networks, and how standard Ethernet IP protocols were becoming prevalent in industrial and control networks.Each year, tens of thousands of IT and communications professionals attend Cisco Live events held around world. Hundreds more participate virtually through Cisco Live and Networkers Virtual. Cisco Live offers an unparalleled combination of education and training on the latest technologies and trends; testing and certification on Cisco products; and the opportunity for attendees to extend their professional networks by forging new connections with like-minded colleagues.
Download Links :-
Cisco Live (2011) Slides Ebooks Collection.Part3
Cisco Live (2011) Slides Ebooks Collection.Part4
Cisco Live (2011) Slides Ebooks Collection.Part5
Cisco Live (2011) Slides Ebooks Collection.Part6
Cisco Live (2011) Slides Ebooks Collection.Part7
Tag :
CISCO
TrainSignal Microsoft Excel 2007 Training, 77-602 Exam, MCSE

TrainSignal Microsoft Excel 2007 Training, 77-602 Exam, MCSE (2.67 GB)
The Most Comprehensive 12 Hours of Hands On Microsoft Excel 2007 Training Guaranteed or Your Money Back! Learn All of the Simple Tools & Techniques Used By Professionals to Increase Productivity, Enhance Efficiency and Improve Business Analysis and Reporting!
A Word from Bill KultermanCIW, MOS Master Certified
Whether you’re tracking expenses, budgeting goals or creating massive keyword lists with one million rows, the new Microsoft Excel 2007 will streamline your workflow like never before.
And thanks to Train Signal’s newest Excel 2007 course, you’ll master all of those time saving features, and business building tools in no time. No stone is left unturned as we break down common to advanced concepts into easy, hands on lessons!
We are so convinced that this course is the most comprehensive Excel 2007 training on the market, that we guarantee your satisfaction for 90 days! And if certification is your goal, rest assured that this course will help you pass the 77-602 MCAS Exam!
Download Links :-
TrainSignal Microsoft Excel 2007.Part1
TrainSignal Microsoft Excel 2007.Part3
TrainSignal Microsoft Excel 2007.Part4
TrainSignal Microsoft Excel 2007.Part5
TrainSignal Microsoft Excel 2007.Part6
TrainSignal Microsoft Excel 2007.Part7
Proxying requests to the published site using ISA Server or Threat Management Gateway
In ISA Server 2004\2006 or Forefront Threat Management Gateway 2010 the “Proxy requests to published site” setting is one of the most confusing yet simple configuration options when publishing a server.


When you publish a website using the website publishing rule feature the default setting is to select the “Requests appear to come from the Forefront TMG computer” radio button available in the To tab of the website publishing rule’s properties dialog box. This is what I would call the “safe” option but as we’ll find out not necessarily the correct option for your environment (see image below):
Note: The default setting for publishing non-web server publishing rules is set to “Requests appear to come from the original client.” More on this specific setting at the end of this article.
With the setting “Requests appear to come from the Forefront TMG computer,” the logic is as follows:
The request comes into TMG and TMG sends it back to the web server. When TMG does this it changes the “Source IP” address field in the IP Header to its Internal adapter IP address. When the web server sees this request (assume it’s on the same logical segment as TMG), it sees the source IP is TMG. The web server then checks its routing table and says “This address is directly accessible to me. All I have to do is ARP for this IP and if I get a ARP response, I’ll deliver it directly to that host.” The response is complete as far as the web server is concerned.
Now, with the setting “Requests appear to come from the original client,” the logic goes like this:
The request comes into TMG and TMG sends it back to the web server. When TMG does this it leaves the “Source IP” address field in the IP Header alone (i.e. the external client’s IP is maintained.) When the web server sees this request (assume it’s on the same logical segment as TMG) it sees the Source IP as someone on the Internet. The web server then checks it’s routing table and says “This address isn’t directly accessible to me. My routing table says that if I don’t have a more specific route I’ll just punt and send it to my default gateway. Let me ARP for the gateway and if I get a response, I’ll deliver it to that system”. The request is now done as far as the web server is concerned.
You can see this behavior by opening a command prompt and typing “netstat -ano” without the quotes. This command displays your current network connections. You will be able to see the internal TMG source IP address or the client source IP address depending on the setting you have in TMG.
With the setting for “Requests appear to come from original client” it is essential that the return path for the responses from the web server honor the incoming path of the request. In other words, if the request came in from TMG and this setting is enabled, then the response has to go out through TMG as well. In other words, if you select the option “Requests appear to come from the original client” you must have the web server’s default gateway set to the TMG’s internal IP address! This begs the question as to why can’t TMG’s response go out some other device for the response such as another internal router? There are two reasons for this:
1) If the other device is capable of stateful inspection, it will not have any state for the response from the web server since the original packet came in through TMG.
2) Even if that device doesn’t perform stateful inspection it most likley does NAT. As the response goes through that other device, the Source IP will get changed to the NAT device’s IP and by the time the original client gets the response, the Source IP is not who the client sent it’s request to and it will drop the response.
They say a picture is worth a thousand words and in this case a graphical representation of what is going on helps. Below are four graphs depicting the four possible scenarios.
Scenario 1: Requests appear to come from the TMG computer. Default Gateway is TMG :
The below graph shows a client request traversing through TMG with the default setting of “Requests appear to come from the Forefront TMG computer.” The default gateway of the web server is set to TMG. This configuration will work but the downside to this configuration is that the web log files will only contain the IP address of the TMG’s internal interface obfuscating the true source of the request. This is a surefire way to infuriate the marketing folks, which for some of you may actually be an enjoyable thing to do. This scenario is a safe option but totally unnecessary in my opinion. If the Web server’s default gateway is set to the TMG server then there is no reason to have the requests appear to come from the Forefront TMG computer unless you want to purposely obfuscate the IP addresses in the web log files.

Scenario 2: Requests appear to come from the TMG computer. Default Gateway is a router.
The below graph shows a client request traversing through TMG with the default setting of “Requests appear to come from the Forefront TMG computer.” The default gateway of the web server is set to another router. This configuration will work but you have the same downside to this configuration as scenario 1 in that the web log files will only contain the IP address of the TMG’s internal interface. You will typically encounter this scenario in larger enterprises where they likely have a more complex routing infrastructure and they want the TMG server’s default gateway set to a router for policy reasons.

Scenario 3: Requests appear to come from the original client. Default Gateway is TMG.
The below graph shows a client request traversing through TMG with the setting of “Requests appear to come from the original client.” The default gateway of the web server is set to TMG. This is the most common scenario and the one that I use almost exclusively. This configuration will work and the web log files will contain the client’s Source IP address. I can hear the marketing folks jumping for joy.

Scenario 4: Requests appear to come from the original client. Default Gateway is a router.
The below graph shows a client request traversing through TMG with the setting of “Requests appear to come from the original client.” The default gateway of the web server is set to a router. I’ve saved the worst scenario for last because this is the scenario where people get into trouble. This scenario will not work because the client’s source IP address is maintained all the way to the TMG server but the TMG server forwards its response out through its default gateway breaking the chain of communication.

The question then becomes how can you maintain the client’s Source IP address in the web logs in this scenario? The only solution that I found is by using Microsoft’s ARR (Application Request Routing) proxy-based routing module. This appears to only work with IIS 7 though.
At the beginning of this article I briefly mentioned that the default setting for publishing non-web server protocol publishing rules is for the request to appear from the original client. So, the question then becomes why is this default setting different from publishing standard website publishing rule? I came across a possible scenario which may explain the reason. When publishing the latest version of a Microsoft CRM website you must use HTTPS. Microsoft CRM uses forms-based (or claims-based) authentication so that you log in using a secure form to gain access to your CRM website. What if you want to securely publish CRM for multiple companies using a wildcard SSL certificate? You would purchase a wildcard SSL certificate (i.e. *.example.com) and then you would create a non-web server protocol publishing rule in TMG using the HTTPS protocol. This wildcard SSL certificate then allows you to host CRM for multiple companies such as company1.example.com, company2.example.com and so on using a single HTTPS web listener. Microsoft CRM has intelligence built into the form whereby it inspects the URL that you are sending it and then depending on the URL it will forward you to the proper CRM database on the back end. This behavior only appears to function properly when you have the HTTPS rule set to have requests appear to come from the original client. If you have the other setting applied where the TMG server replaces your source IP with its IP address you will no longer get a form to sign on with but instead you will be presented with a pop-up window to logon to the domain.
Tag :
Microsoft Xp
Running a Command Prompt as NT AUTHORITY\SYSTEM
I recently ran into a situation where I was using the SysInternals tool ProcDump to write a dump file to be examined for a memory leak.
The problem started when trying to run ProcDump against the process oracle.exe. The error message was “Access denied.”
I was am administrator on the server so how could I become more powerful than an administrator?
The answer comes in the form of opening a command prompt as NT AUTHORITY\SYSTEM, which will then grant us the authority to access the oracle.exe process to create a dump file.
The first step is to download the Sysinternals tool PsExec from the below URL:
http://technet.microsoft.com/en-us/sysinternals/bb897553.aspx
Extract PsTools.zip to a folder on your hard disk.
Launch a command prompt as administrator (right-click the command prompt shortcut):

In the command prompt navigate to the folder containing the PsTools.zip extracted data.
We will now launch PsExec.exe with the -i and -s switches to launch the program interactively using Local System.
psexec.exe -i -s %SystemRoot%\system32\cmd.exe
Type whoami at the newly opened command prompt and you will see that you are now running as NT AUTHORITY\SYSTEM:

You can now execute ProcDump against the process that you were previously denied access to and complete your work.
Note: If your system does not have whoami.exe, you can typically find this program as a separate download via the resource kit or support tools appropriate to your Microsoft operating system.
Tag :
Tips and Tricks
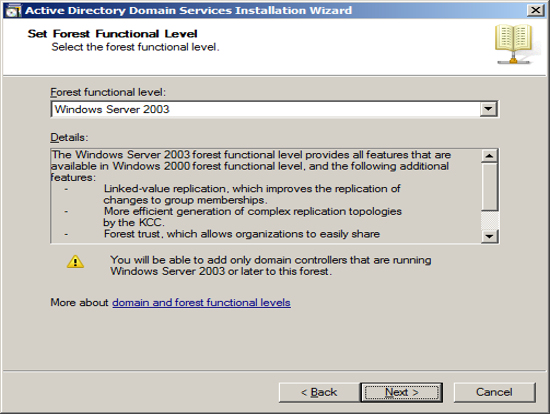
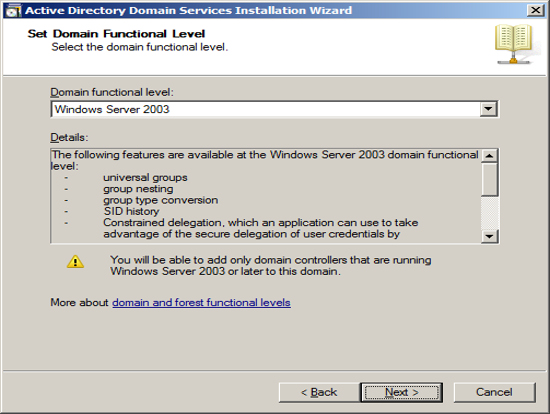
Adding a Child Domain Using Windows Server 2003 vs Windows Server 2008 R2
If you’ve ever had to add a new domain tree to an existing domain in Active Directory using Windows Server 2003 you may have already realized that you must have DNS configured properly before creating the new child domain. Put another way, if you didn’t know what you were doing you could get into trouble very quickly. With Windows Server 2008 R2 this process is dramatically simplified and the steps for DNS delegation are done for you automatically.
Our example forest is simple with bigfirm.biz representing the forest root domain and ecoast.bigfirm.biz representing the child domain.
The domain controller in bigfirm.biz is bigdog.bigfirm.biz at 192.168.2.130.
The domain controller in ecoast.bigfirm.biz is srv1.ecoast.bigfirm.biz at 192.168.2.131.
If you’ve read any of Mark Minasi’s books you’ll notice that this is the naming convention he uses.

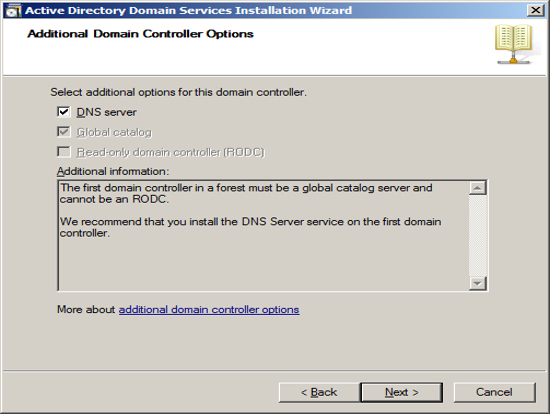
In the below screenshot you can see that I already ran DCPROMO on bigdog.bigfirm.biz and DNS is already configured with the DNS forward lookup zones already populated.
Note: I had the DCPROMO process automatically install and create DNS for me for this process.

Now we’re at the point where we want to add the child domain of ecoast.bigfirm.biz to the existing forest root domain of bigfirm.biz.
With Window Server 2003 you must create the DNS domain on the parent before you run DCPROMO on the child domain controller.
Therefore, right-click the bigfirm.biz DNS zone and select the option to create a new domain and then enter the domain name of ecoast. You don’t have to enter any records in ecoast.

The next step is to prepare the child domain controller in the child domain.
On srv1.ecoast.bigfirm.biz you need to point its primary DNS server to the parent DNS domain controller (bigdog.bigfirm.biz) at 192.168.2.130. If you screw-up here and point DNS to itself the child domain controller will have no way to get home to the “mothership” and report an error once you try to run DCPROMO.

There is another minor but very important procedure that you must also do on the child domain controller (srv1).
You must populate the DNS suffix box with the new domain that you are creating (ecoast.bigfirm.biz). If you don’t do this step then the child domain controller will not populate the DNS records properly at the parent DNS zone.

Once all of these procedures have been done you can now run DCPROMO on the child domain controller srv1.ecoast.bigfirm.biz.
Note: Don’t forget to allow dynamic updates on the parent DNS server (bigdog.bigfirm.biz) or else the process will fail. The DCPROMO process should warn you of this.
What I see happen a lot with Windows Server 2003 is that it takes WAY too long for these DNS records to populate at the parent. In fact, it may take upwards of 10-15 minutes or so. Don’t be surprised if you see errors in the system event log on srv1 such as this (see screenshot below). This type of problem usually auto-corrects itself but if it doesn’t you can try opening a command prompt and typing ipconfig/registerdns on srv1 to see if it can help speed up the process.


You’ll notice that DNS is not being hosted on srv1 but is instead being hosted on the parent domain controller bigdog. What if you want to have srv1 host the DNS zone ecoast.bigfirm.biz instead? You can easily do this by a process called DNS delegation. DNS delegation can be a good idea especially if you want to reduce network traffic, provide redundancy and simplify your DNS environment. There is a great KB article on how to create a child domain in Active Directory and delegate the DNS namespace to the child domain. The KB article for this is listed at the end of this article.
From my perspective, the above procedure seems time consuming and laborious. Wouldn’t it be nice if Microsoft improved on this procedure? With Windows Server 2008 R2 your wish has come true. I get the impression that the directory services team at Microsoft took some heat for this procedure on Windows 2003.
For the below example, everything remains the same except we are now using Windows Server 2008 R2 as our operating system.
After running DCPROMO on bigdog in our forest root domain bigfirm.biz our DNS zone looks like this:

Now, here is where things get super cool. Remember all of the steps that we went through to prepare our DNS environment before we could even introduce a new child domain into the mix?
Well, prepare to be amazed.
As before with our Windows 2003 example, on srv1 make sure that you point the primary DNS server to the parent DNS server (bigdog.bigfirm.biz).

Once you do that all you have to do now is run DCPROMO on srv1!
One thing I like about the new DCPROMO with Windows Server 2008 R2 is that it automatically checks and detects that there is no DNS server authoritative for the ecoast.bigfirm.biz domain. Therefore, because it could not find an existing DNS server authoritative for ecoast.bigfirm.biz it will automatically create a DNS delegation for you. Brilliant!


Below is a screenshot of what the bigfirm.biz DNS zone looks like on bigdog.bigfirm.biz after the DCPROMO process completes on srv1.
Notice that ecoast is greyed-out indicating that the zone is now delegated.


They say the devil’s in the details and Window Server 2008 R2 does not disappoint. Below you can see that the DCPROMO process automatically adjust the primary DNS server on srv1 to itself and points its secondary DNS server to its parent DNS server.

That's all
Tag :
MCSE
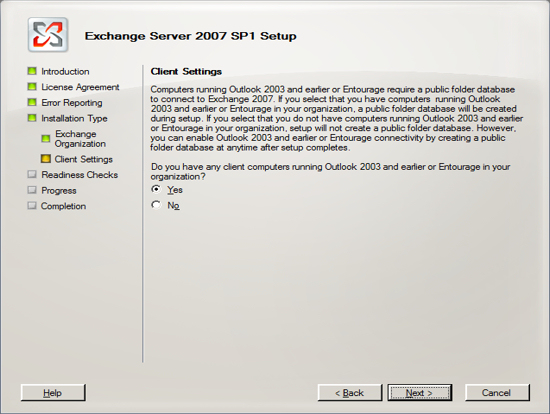
How to Setup Exchange Server 2007

How to Setup Exchange Server 2007
Pre-Installation Checklist :-
Make sure you have all of the following steps in place before you setup Exchange Server 2007 on Windows Server 2008 64-Bit.For simplicity we are assuming you are setting up a small office where one machine will be used for both the Active Directory and the Exchange Server. This setup works just fine and reduces the number of machines to maintain. If you have a larger office you may want to consider separating the Active Directory machine and the Exchange 2007 Server.
Install Windows Server 2008 64-bit version :-
Exchange 2007 is a 64-bit application and requires 64-bit versions of Windows Server 2003 or Windows Server 2008. You should select a computer that is capable of running the 64-bit version of Windows Server 2003 or 2008. For this example we will start with a clean installation of Windows Server 2008 64-bit version that has not had any roles installed.
After installing Windows Server 2008, we set the clock and the name of the server to be "EX2007". At this point this server is configured to be a stand-alone computer with default settings.

The default installation of Windows 2008 sets your IP v4 and IP v6 addresses to use DHCP. Since we will be configuring this computer to be a domain controller, you must change the IP address of the computer to be a static IP address.
To change your IP address, click on "View Network Connections" in the Server Manager screen.
This will display the list of active network interfaces.

Double-click on your network adaptor to display the adaptors status.

Press the Properties button.

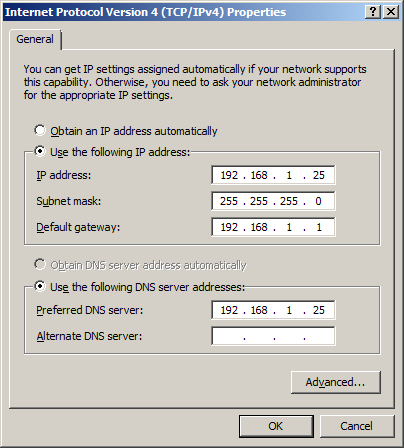
NOTE: It is important to include this computer in the DNS list. You should list the IP address of this computer as the first entry in the list of DNS servers. In the "Alternate DNS server" field, enter the IP address of a DNS server provided by your ISP.
Press OK to save your changes.
Now you will need to modify the support for IP v6. If your network uses IP v6, then you will need to select "Internet Protocol Version 6 (TCP/IPv6)" and press the Properties button. Enter a static address. If you are not using IP v6, you can leave the IP v6 set to the default setting of DHCP.
NOTE: Exchange requires that IP V6 be enabled. Even if you do not use IP V6 you must leave it enabled. During the setup of Active Directory, the Active Directory Setup Wizard will check that both IP v4 and IP v6 have static addresses as long as the IP v4 address is static you can continue the installation. DO NOT DISABLE IP V6 or else the Exchange Hub Transport Service will not start.
At this point you should have all IP addresses on this server configured as static IP addresses. OR you have the IP v4 address configured as static and the IP v6 configured using DHCP. Press OK to save your changes and close the network connection screen.
Activate Auto Update :-
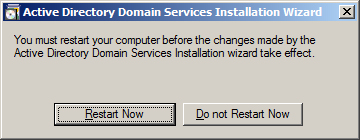
The next step in making this server a domain controller is to activate auto update. Active Directory will not install until this computer has auto updates active. To activate auto updates click on the link "Configure Updates". Then select the option to have Windows automatically install updates. At this time Windows will download updates and will most likely need to reboot your computer. Allow the updates to be applied and the computer to be restarted until all updates are applied before installing Active Directory. You do not want to be in the middle of installing Active Directory when an auto update needs to reboot your computer.

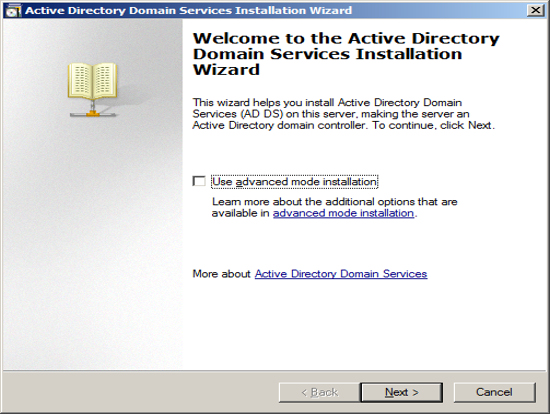
The process of installing Active Directory consists of two steps, the first step is to install Active Directory and then you will need to configure your Active Directory. Once this is complete your Windows Server will now be a domain controller.
Step 1 - Install Active Directory
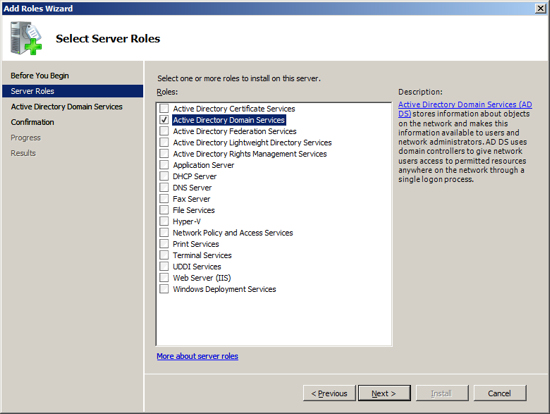
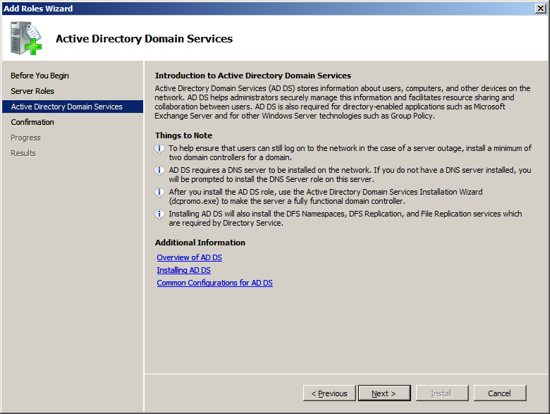
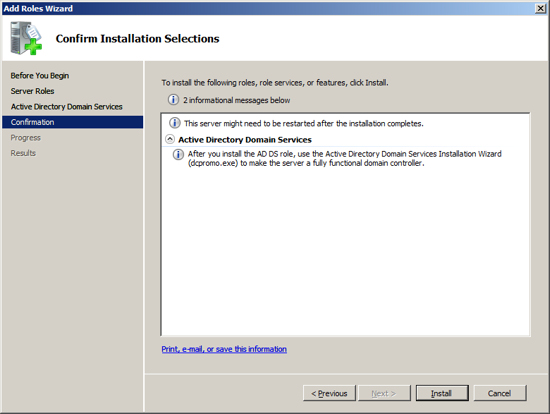
At the Computer Management Screen press the "Add Roles" link. At the Select Server Roles dialog check/tick the option "Active Directory Domain Services" and press Next.
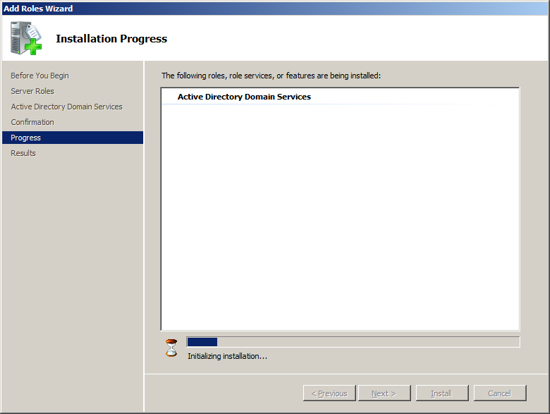
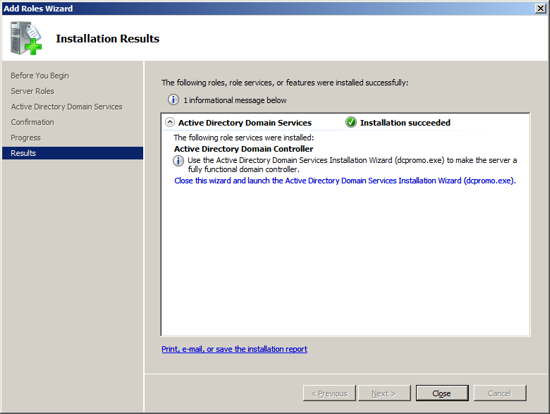
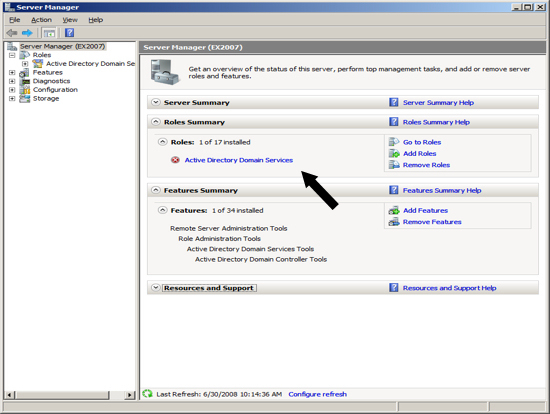
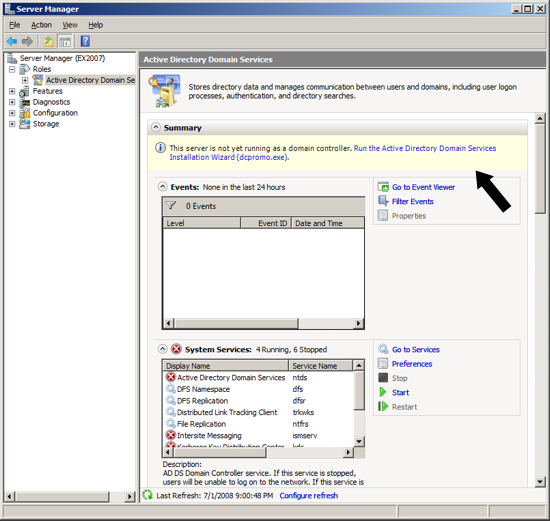
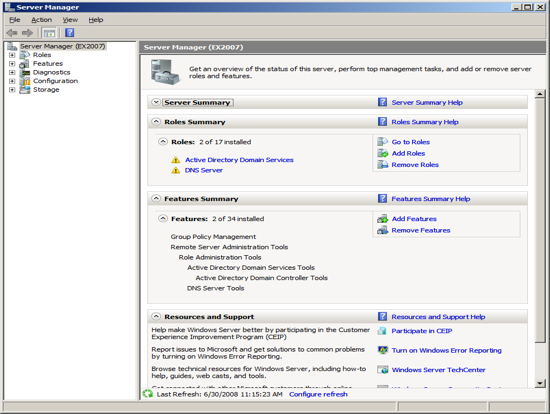
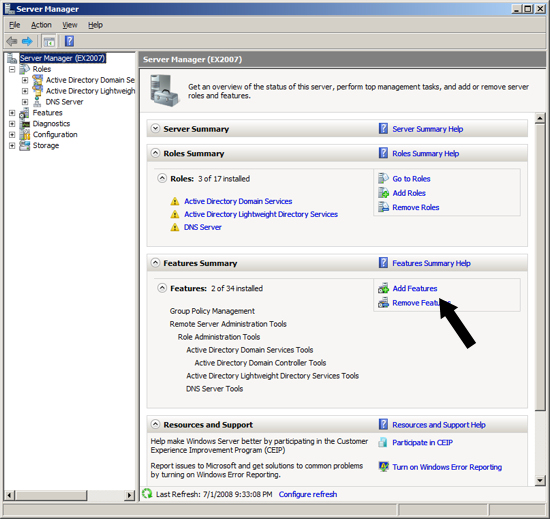
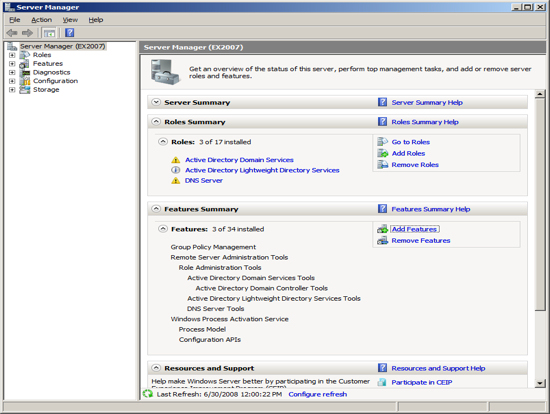
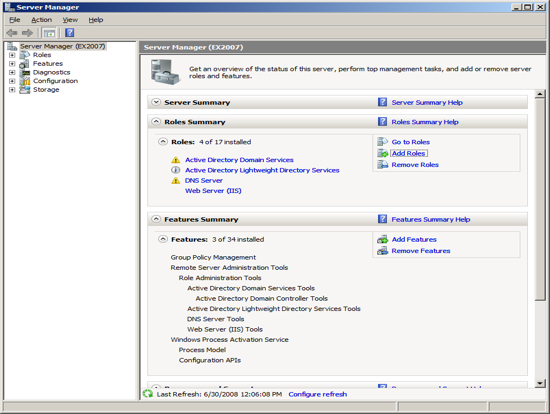
At the Server Management screen you should now see that you have 1 role installed. The Active Directory Domain Services may indicate that it is installed but there are errors. This is because the software is installed but not configured.
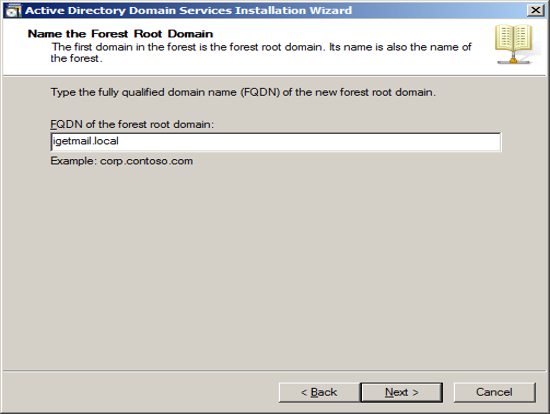
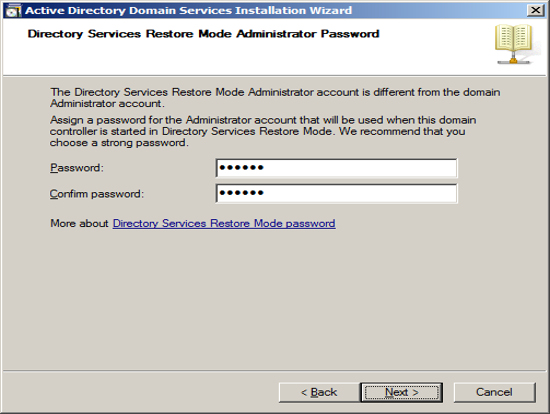
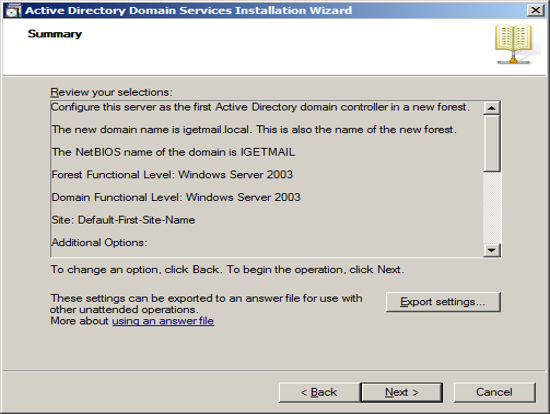
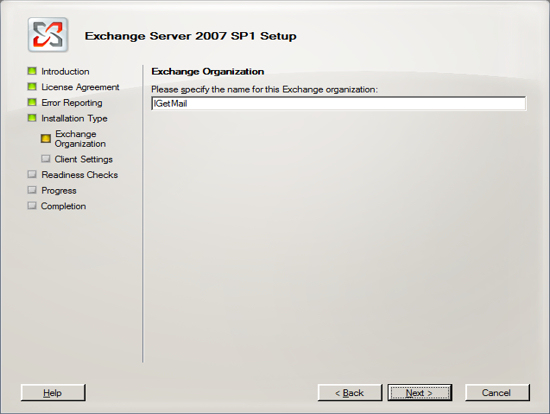
In our example we are assuming that IGetMail.com is hosted at an Internet Hosting Company. Since we do not host IGetMail.com on this Exchange Server, we will use IGetMail.local to indicate our internal domain for IGetMail.
NOTE: Once you enter your domain name it is very hard to change it in the future, so you should take great care when enter this name.
Press Next once you have decided on the name of your internal domain, that will be your Active Directory Domain and the domain serviced by Exchange.
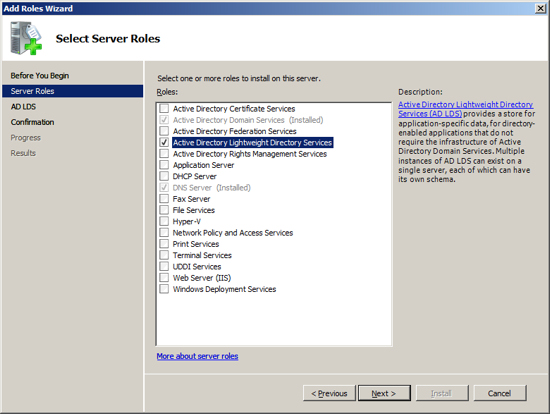
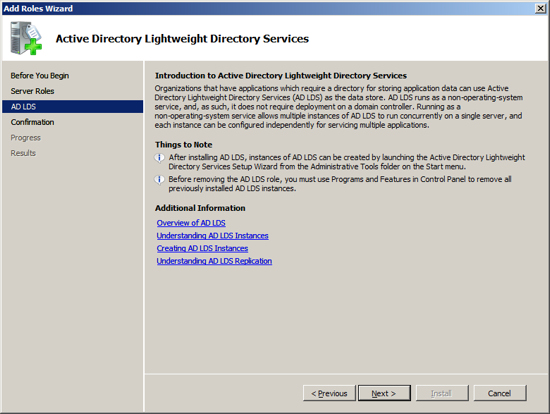
Now that have your Server configured for Active Directory, Exchange requires that you add the Lightweight Service. NOTE Exchange only requires that the Lightweight services are installed but does not require the services to be configured.
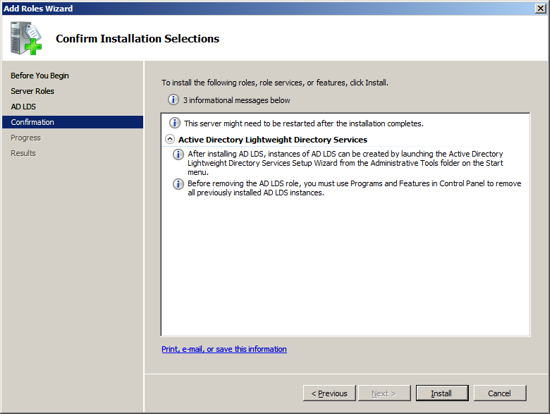
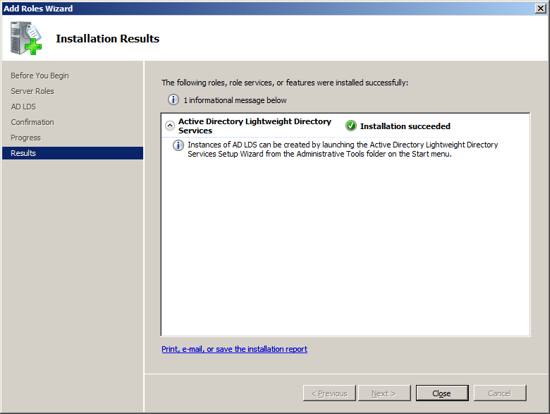
Click on the link "Add Roles" and then select to add the role "Active Directory Lightweight Directory Services" and press Next.

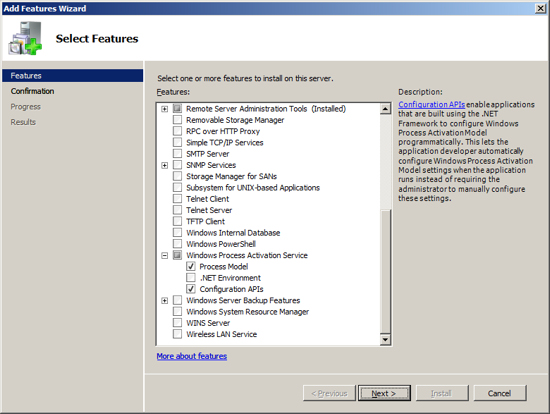
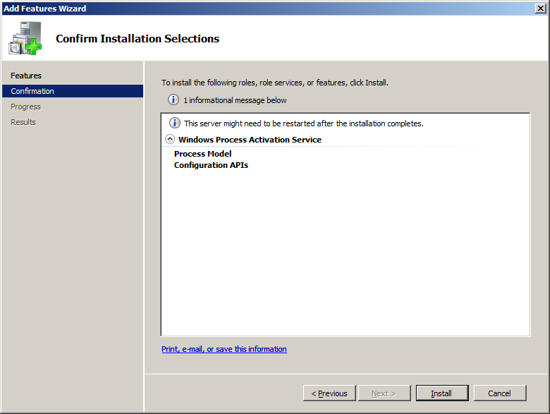
Add feature - Windows Process Activation Service
The next feature that Exchange needs installed sis the Windows process Activation Service. To install this feature click on the link "Add Features".
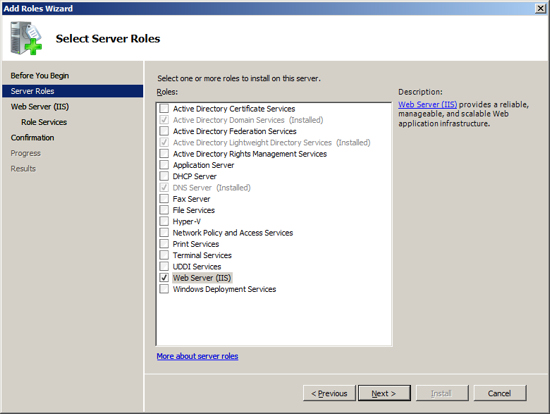
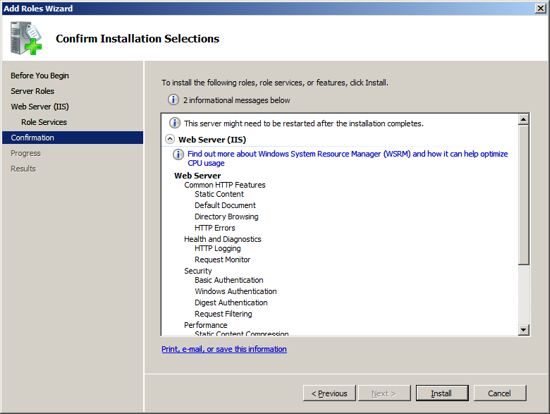
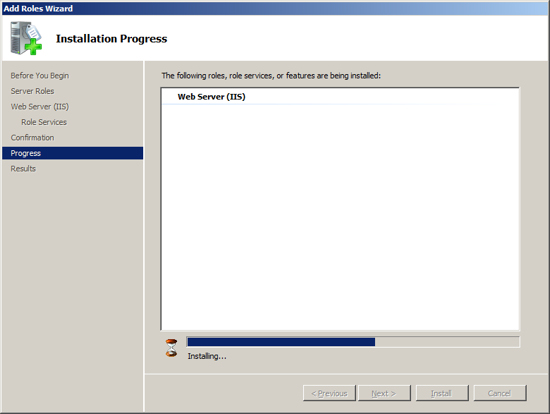
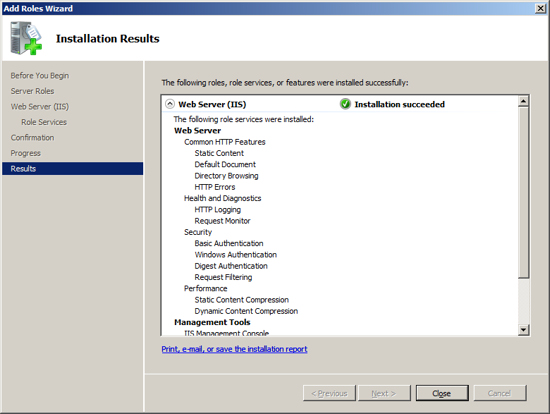
The next Role that Exchange needs installed is the Web Server IIS. To install this role, at the Server Manager click on "Add Roles".
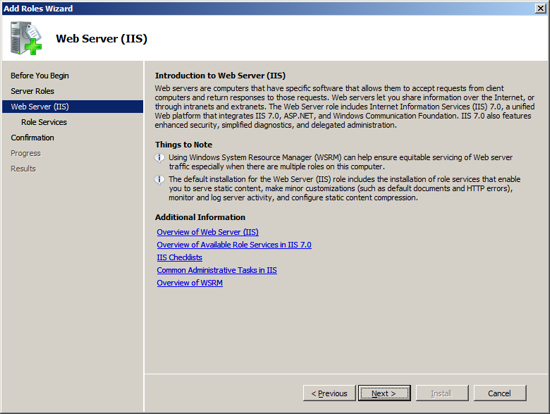
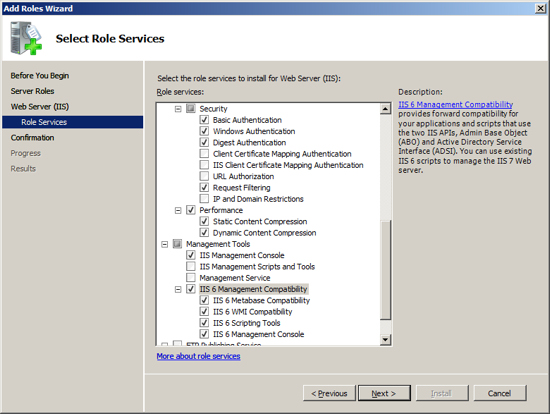
Check / Tick the following additional service in additions to the default settings:
- Security - Basic Authentication
- Security - Windows Authentication
- Security - Digest Authentication
- Performance - Dynamic Content Compression
- Management Tools - IIS 6 Management Compatibility (include all items under this service).
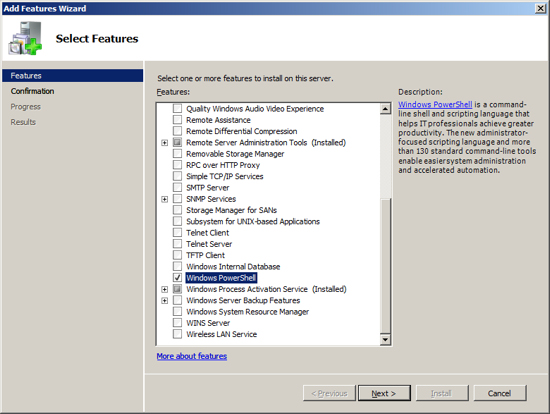
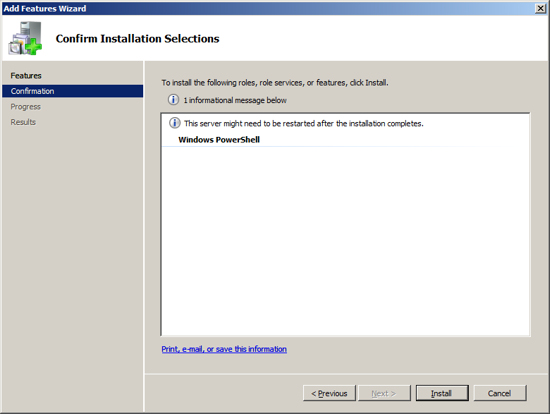
Now you are ready to install the last feature that Exchange requires as a prerequisite. At the Server Manager click on "Add Feature".

Exchange has a requirement to use its own SMTP service and not the SMTP Role that is built into Server 2008. As a result you must not install the SMTP feature from the Server Manger. This will be installed by Exchange. Note that the Exchange Setup wizard will issue a warning that the SMTP services are not already installed, yet if you install the Windows 2008 SMTP feature, the Exchange Setup will consider that an error.
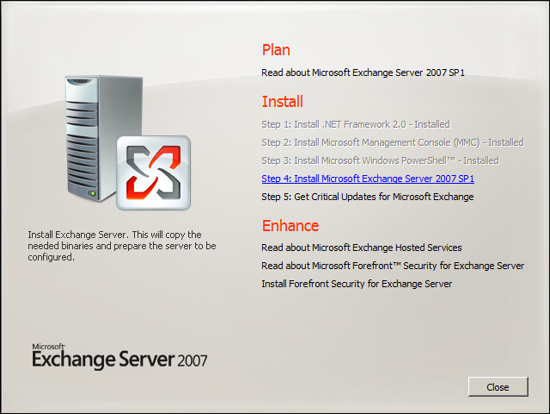
Installing Exchange Server 2007
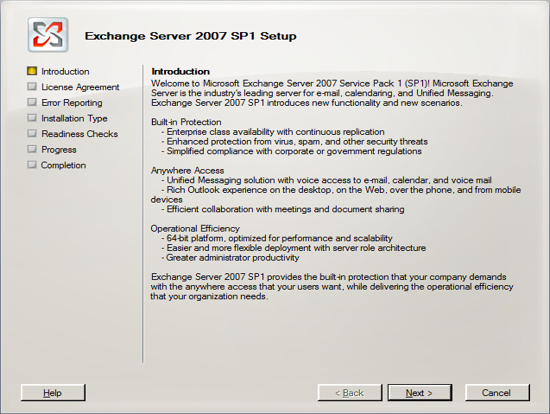
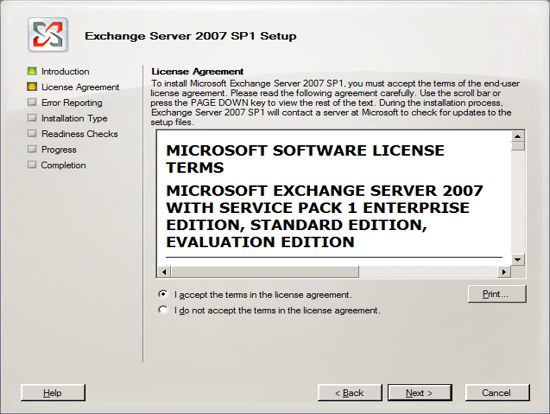
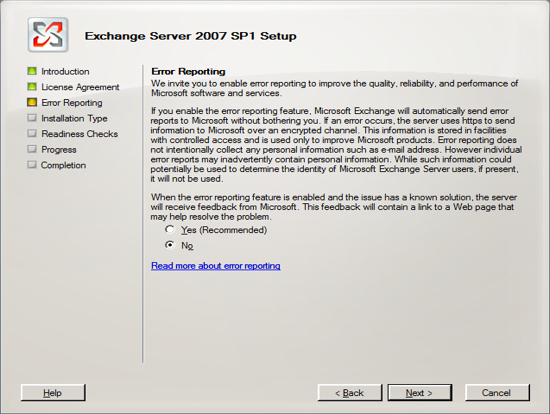
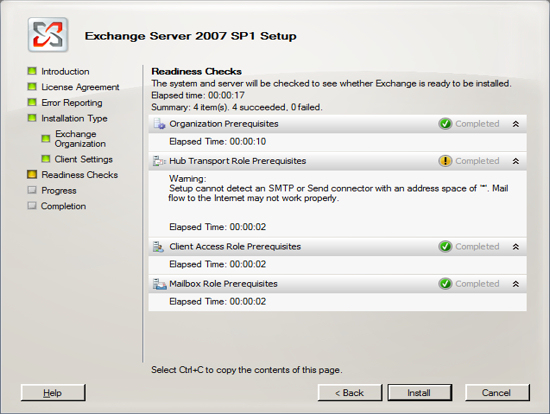
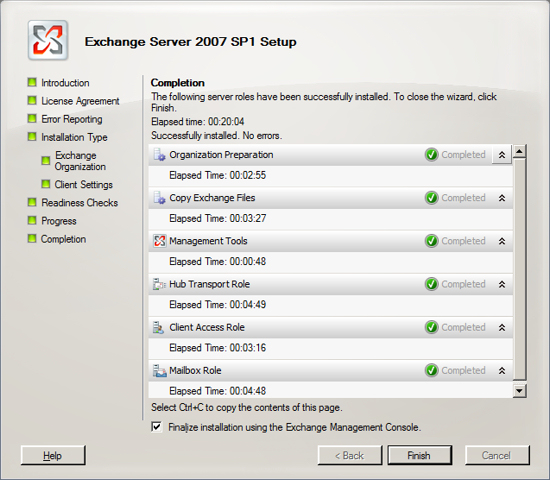
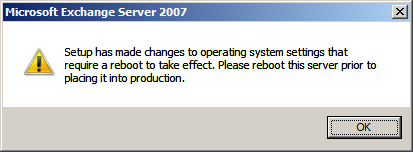
You are now ready to install Exchange Server 2007. Run the Exchange Server 2007 setup and click on the link to Install Microsoft Exchange Server 2007 SP 1.

IGetMail Version 3.x instructions:
When you are running IGetMail version 3.x you can instruct IGetMail to send email to your Exchange server using an authenticated user or anonymous access.
Authenticated User Access - With this method you instruct IGetMail to use a specific Exchange user account to connect to the Exchange Server. Once connected through this account, IGetMail can send email to any of your Exchange user accounts. In order to use this method, the Exchange user account must be a member of the Exchange Server Group within Active Directory.
To setup Authenticated Access:
- Open the Exchange Management Console
- Expand "Server Configuration"
- Select "Hub Transport"
- In the middle section of the Management Console you will see the list of Receive Connectors.

- Right click on the Receive Connector "Default ServerName" and choose Properties
- Select the "Authentication" tab.
- If you do not have an SSL certificate from a third party SSL provider, then Uncheck / Untick the option "Offer Basic authentication only after starting TLS". By default Exchange will not allow users to authenticate until you have an SSL certificate. Unchecking / Unticking "Offer Basic authentication only after starting TLS," allows Exchange to offer Authenticated login over standard SMTP.
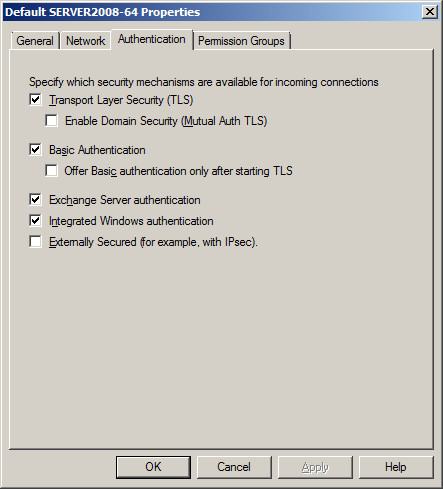
- The Windows account must have a mailbox in Exchange
- The Windows user must be a member of the group "Exchange Servers"
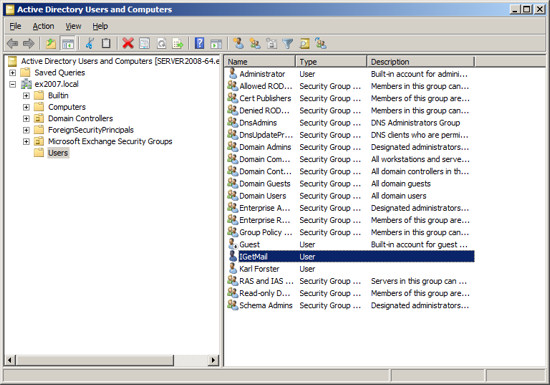
- Run Active Directory for Users and Computers.
- Select the Users group in the column on the left.
- Right Click and add a new user. In our case we choose to name this new user "IGetMail" since we will use this Windows user account to route the email through as the email is delivered to all of the other users within Exchange.
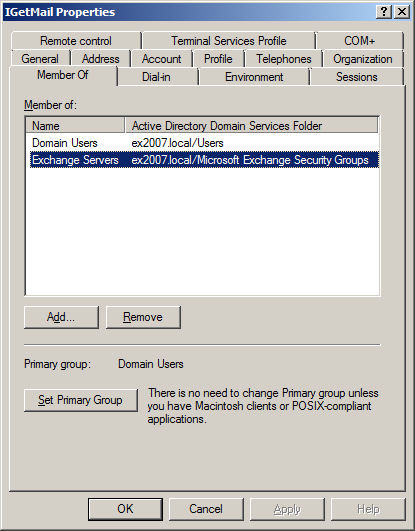
- Select the Window user account that you want to have IGetMail use to connect to your Exchange Server. Right click on the user name and choose Properties.
- Go to the "Member Of" panel.
- Press the Add... button.
- Add the Group "Exchange Servers" to make this Windows account a member of the "Exchange Servers" group. This will grant this Windows account the rights to route email to other users. This is needed for IGetMail to route email to your users.
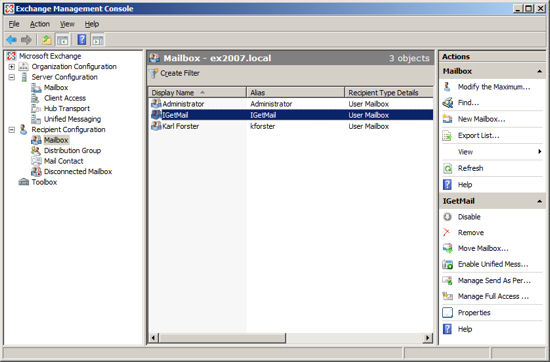
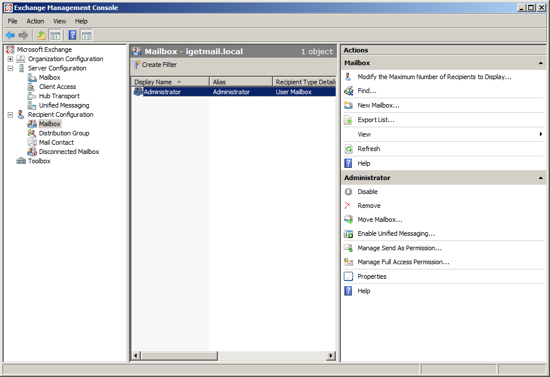
- Run the Exchange Management Console
- Expand "Recipient Configuration"
- Select Mailbox to show a list of existing Exchange Users
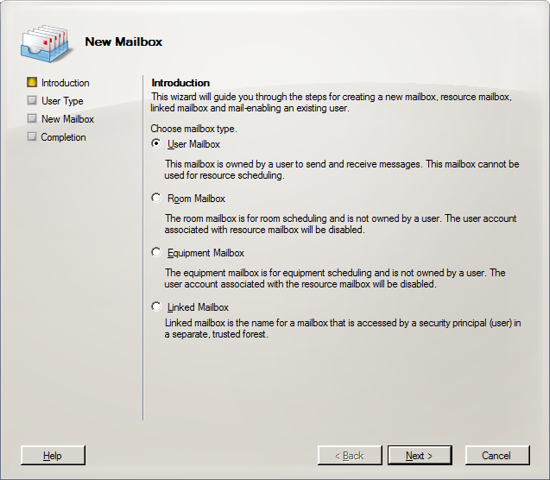
- Right Click on "Mailbox" under "Recipient Configuration" and select New Mailbox or Click on New Mailbox in the Actions Column on the right hand side.
- Add the Windows account that you want IGetMail to use to the list of Exchange users. In our example below we have added the account "IGetMail" to the list of Exchange Users.
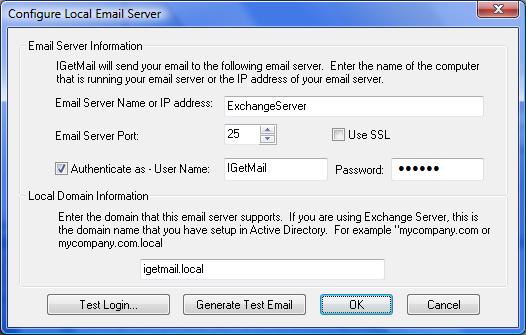
- At the Status Panel, press the "Modify SMTP Settings" button.
- Check / Tick the option "Authenticate as - "
- Enter the Name of a Windows User Name that you want IGetMail to use to connect to the Exchange Server. This Windows account must have a mailbox in Exchange and must be a member of the "Exchange Serves" group.
To Setup Anonymous Access:
Anonymous access - With anonymous access you can allow anyone to send email to any of your users. In this case IGetMail only has to connect to the Exchange Server, it does not need to log into a Windows Account.
To configure Exchange to allow any user to route email perform these steps:
- Open the Exchange Management Console
- Expand "Server Configuration"
- Select "Hub Transport"
- In the middle section of the Management Console you will see the list of Receive Connectors.
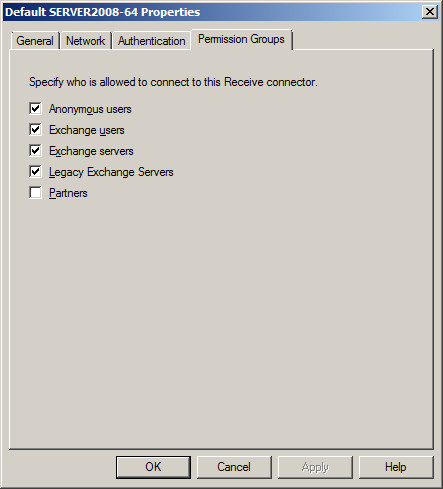
- Right click on the Receive Connector "Default ServerName" and choose Properties
- Select the "Permissions Group" tab.
- Check / Tick "Anonymous Users"
- Save your changes.
- Now anyone can connect to the Exchange Server and route email to any user.
When you are running IGetMail Version 2.x and 1.x you need to allow anonymous SMTP connections for your server.
Method 1 - Run the Exchange Management Console. Expand the Server Configuration and select Hub transport. In the lower half of the screen under the tab "Receive Connectors" right click on the connect labeled "Default <Name Of Your Server>" and select Properties. At the Properties for the default server select the Permissions Group tab. At the Permissions Group Tab, check / tick the option Anonymous and save your changes.
Method 2 - Run the following management shell command (note this is the Exchange Management shell and not the PowerShell):
Set-ReceiveConnector -Identity "Default <ServerName>" -PermissionGroups "AnonymousUsers"
Where you would replace <ServerName> with the computer name of this server.
Adding E-Mail Users :-
Run the Exchange Management Console. Expand the item "Recipient Configuration" and select Mailbox.
Tag :
MCSE