Showing posts with label Exchange Server. Show all posts
Overview of Exchange Server 2010 Unified Messaging

Exchange Server 2010 Unified Messaging
In this overview I’ll outline the many features of Unified Messaging for you to look for when using this service. However, let’s first start by analyzing why it is worth using for your company and the advantages it offers over just the bare Microsoft Exchange 2010 application.
Benefits of Exchange 2010 Unified Messaging
As you probably know, Microsoft Exchange 2010 is integrated with Outlook. It allows each employer to connect to a server application and stay connected. Contact keeping and e-mail messaging are its trademark services. However, many companies also rely on voicemails to keep in touch with clients and for employees to communicate remotely. This is why Unified Messaging is such a powerful tool for any Exchange 2010 user. If you want to integrate voicemail and e-mail messages into a format that is easy to navigate, then you need to integrate Unified Messaging into your company’s workflow.According to Microsoft TechNet, “Microsoft Exchange Server 2010 Unified Messaging (UM) combines voice messaging and e-mail messaging into a single messaging infrastructure.”
The service implementation involves users accessing voice messages either through mp3 files from their inboxes or through a text format (we will go more in-depth about these features below). Compatibility includes telephones, mobile phones, Macs and PCs. TechNet describes the implementation process:
“After Unified Messaging servers have been deployed on a network, users can access their messages using Outlook Voice Access, from any telephone, from a mobile phone, or from the computer.”
This is an optional service for anyone who owns the standard Exchange 2010 application with no additional up-front costs. Exchange 2010 Unified Messaging has a couple standout features, like conversions of voice to text inputs, as well as great security. It fuses voicemails and e-mail into a single format that allows easier access and record keeping.
Here are some aspects of Unified Messaging worth noting:
1.Voicemail and email messages consolidated into a universal inbox
2.Voicemail preview that allows you to read your voicemail messages
3.Customized greetings and call transfer options to reduce the likelihood of missing an important call
4.Removes the need to purchase or manage a separate voicemail system
Exchange 2010 Unified Messaging isn’t just based on voicemail management. It also features voicemail security, auto attendant features, and more flexibility over answering phone calls. Here is a list of features and functions that may help your business operate more efficiently if you decide to use this service.

Voicemail Preview
This voicemail preview function is what makes Exchange 2010 Unified Messaging really stand out and come highly recommended for enterprise users. This allows users to either listen to voicemails or read them in text format from their e-mail mailboxes. By reading some of the text of a voicemail, users can save time by not having to listen to every voicemail in order. They will also know exactly which voicemail to jump to because of search functions and descriptions present in the text. Using this feature, Exchange 2010 creates a text version of voicemail that is sent with an MP3 file to the user’s e-mail inbox.Outlook Voice Access
Another one of UM’s features is called “Outlook Voice Access.” This feature is related to the Microsoft Outlook app and gives users control over their inboxes. It allows users to have “anywhere access” to their mailboxes even if they do not have an online connection present. This feature prevents the worry for employees not being able to manage their calendar, contacts and e-mail when disconnected or simply traveling to where an Internet connection may not be available. Voice commands or telephone keypads are both supported.

Message Waiting Indicator
“Message Waiting Indicator” (MWI) is a feature worth noting that deals with new or unread voicemails. This feature provides users warning messages saying they have unread voicemails available. It should be quite handy for enterprise users who do not have time to check their voicemail periodically and do not want to miss important calls.Protected Voicemail
This is a permission and security feature that gives administrative users greater control in regards to voicemail answering and forwarding. It uses a service called “Active Directory Rights Management Services.” This service allows Exchange to deny forward permissions to voice messages as designated either by the sender or administrative police. The sender can mark the message as private himself or allow the administrator to design certain privacy rules.Auto Attendant
The “Unified Messaging Auto Attendant” feature deals with contact information gathering. Callers can find information about the person they are trying to reach with this feature. They can do this by either using the keypad or with speech inputs and voice recognition. Using either method, they can locate a specific user and call them. The Auto attendant feature also allows users to create custom menus for callers, define information greetings, define business hours greetings, and define standard greetings. Users can even set up holiday schedules and enable external users to call the operator. The auto attendant feature gives greater control to messaging, greetings, answering calls, and reaching clients.Call Answering Rules
This feature allows users to be able to let clients and co-workers know how and when to reach them. Answering phone calls in order of importance is very important to many enterprise professions. Call answering rules allow users of Unified Messaging greater flexibility in answering or sending calls. These answering rules deal with custom greetings, Find-Me, call transfer options, and voicemail prompts. Various conditions can also apply to these rules that include caller IDs, time of day, and Exchange status (busy or free).Play on Phone
This feature allows users to check voice messages over telephones, and not just when using computing devices. A great advantage of using a telephone function such as this is privacy. Users may want to listen to voicemails privately and over a phone rather than through their system. Every type of telephone and handset is supported regardless of location; this includes mobile and home phones as well.Voicemail Form
This feature resembles the default e-mail form and gives users an interface for stopping voice messages, pausing voice messages, playing voice messages on a phone, as well as editing notes to voice messages. An embedded Windows Media Player and an audio notes field are included with this feature.Conclusion
Many companies today manage their voice messaging and e-mail services separately. IT admins also have to deal with managing voicemail and e-mail as separate services with separate servers. By consolidating voicemail with e-mail services, servers are freed up to concentrate on other tasks — or less have to be hosted. Other advantages include less multitasking involved for admins and greater compatibility to hardware devices for end users (since they are unified in a system that is compatible across hardware). Compatibility to other devices that connect to the voicemail is also strong, as much so as separate voice messaging services.
Tag :
Exchange Server
Deploying Printers by Using Group Policy – Networking Printers & Windows 2008 Server Part-2
Introduction
For a small network this may well be all you need to know, but with more users and printers there are more tools available to simplify management. In this article we will look at automating printer deployment with Group Policy and how to use GPOs to assign access to printers.
Windows GPOs
Anyone responsible for managing a Windows domain based network should be familiar with the basics of Group Policy Management, and the granular control it allows over virtually every setting available within the Windows client systems. Although quite impressive results can be achieved with old style login scripts (especially if you know vbscript), Group Policy Objects can do much more without requiring you to become a scripting expert. This particular printer challenge is a good example of how apparently complicated solutions can be achieved with a few simple GPO settings and some planning:

Pre-Requisites
To use Group Policy for printer deployment you will need to have a Windows Active Directory domain, and this article assumes that your Domain Controller is a Windows 2008 R2 Server. You will also need the Print Services role installed on a server (can be on your DC), and you will be using the Print Management and Group Policy Management consoles to configure the various settings. Its assumed that you have already followed Part One and have one or more printers shared on your server with the necessary drivers, ready to deploy to your client computers.
Planning Your Printer Deployment
The first thing you need to do is to establish your printer deployment requirements - which users or computers need access to which printers. Ideally to avoid confusion for users you don't want to give them access to printers they will never use, especially if your network is spread over a large building or multiple sites. If you havent done so already then now would be a good time to check that the descriptions and location details of each shared printer are correctly filled out, see Part One for details of how to do this.
Group Policy Objects need to be linked to Organisational Units in your Active Directory, so in order to effectively manage your printer deployments you will need your users and computers divided into suitable OUs. This is particularly important if you want to deploy your printers according to location, so for example if you have an OU containing all the computers in the Accounts department you can then create an "Accounts printers" GPO linked to it. For larger multi-site networks its also worth noting that you can assign printer deployments GPOs to AD Sites, so that laptop users moving between sites will automatically get local printers installed for them.
Printer deployment can be applied as part of either the Computer or the User Configuration section of the GPO, or even both, so there is plenty of flexibility as to how you can set it up. There is also no requirement to create separate GPOs for the printer deployment, so if you already have them set up to configure other features on your client systems you may find it easier just to add the printer settings to your existing GPOs. However for the purposes of this guide we will create a new GPO just for our printer deployment.

In this article we will be using a small network as our example; it has a Windows 2008 R2 Domain Controller with 20 client PCs running a mixture of Windows XP and Vista, split between two offices which each have their own printers in. One office is "Sales", the other is "Accounts", and because their IT requirements are quite different there are two OUs setup in the AD, not surprisingly named "Sales" and "Accounts".
There is also one large copier/printer device which we will want to give all users access to, so our Printer Deployment GPO planning is therefore quite simple; we can have one GPO linked to the "Users" OU for the large copier/printer, and then we will have a GPO each for the "Accounts" and "Sales" OUs that deploy their respective office printers.
Once you have established your printer deployment requirements the next step will be to create the GPO that will apply the settings to the clients for us. To do this you will need to open the Group Policy Management Console (GPMC), which you should find listed under Programs - Administrative Tools on your Domain Controller server. Expand the tree down through your domain until you can see the OU where you have decided you need to create your GPO, then right-click on it and select "Create a GPO in this domain, and Link it here....":

Using the example from above we will create a GPO to deploy our large printer for all users, so having right-clicked on the "Users" OU and chosen to "Create a GPO..." we will name it "Large Printer Deployment" when prompted so our GPMC now looks like this:

Now you have the vital 32bit version of the utility, right-click on your new GPO and select "Edit", and a new window will open containing the options for your GPO. Depending on whether this is a Computer or User based policy (in our example we are applying it to Users) expand down to "Windows Settings" and then select "Scripts" and then in the righthand pane right-click on "Logon" (or "Startup" if it is a Computer policy) and select "Properties":

This will open the "Logon Properties" window (or "Startup Properties" for Computer configuration):

First of all click the "Show Files" button, which will open a Windows Explorer window showing the "Logon" folder - this is in fact one of the default system shared folders on a Windows Domain Controller that clients can access during the logon process. Unless you have previously configured logon scripts or other utilities to deploy via GPO it will be empty though - you now need to copy the "pushprinterconnections.exe" file you downloaded earlier into this folder.
Note that for any additional printer deployment GPOs you create you should repeat this step to add the pushprinterconnections utility, it doesnt cause any problems if it ends up running twice.
Adding a printer to your deployment GPO
If you have had to edit your GPO you can now close that window and the GPMC, and instead open your Print Management console which you should be familiar with from part one of this guide. Expand the "Print Servers" section and select "Printers" to view the list of printers that you have shared in the righthand pane, then right-click the printer you wish to deploy and select "Deploy with GPO". You should then see this window:
Final Steps
You should now have successfully deployed your first printer via GPO, and if you logon to an applicable computer or as a suitable user you should see that the shared printer is available for use. If it isn't then check the Event Logs as any error with the GPO deployment should cause an event to be logged that will indicate the source of the problem. Should you not see any printer or any warning in the Event Log then you may want to use Group Policy Modelling or the "gpresult" tool to check that the GPO is being correctly applied.Group Policy Preferences and Setting the Default Printer
On a final note, you may encounter some guides that recommend the use of Group Policy Preferences for printer deployment instead, and in some scenarios that method does have advantages. However it is more complicated to manage and does not integrate with the Print Management console, hence why I prefer the standard Group Policy. There is one particular situation where they can be particularly useful though, which is when you need to set users' default printer, but that is something to be covered in a separate article.
Tag :
Exchange Server
Networking Printers & Windows 2008 Server Part-1

Networking Printers & Windows 2008 Server
Requirements Before You Start
This guide assumes that you have a Windows based network, with a Windows 2008 (R2) Domain Controller - either a standard server or a Small Business Server 2008/2011 server. Ideally all your printers should have a built-in networking capability, or shared on the network from the PC they are attached to, and you need to make sure you have downloaded all the drivers for the different versions of Windows client on your network. When you have both 64 and 32 bit versions of a print driver it is essential to make sure that the version numbers of the driver package are identical, otherwise it will not work.Setup a Print Server
There are two main benefits to centralizing all your shared printers onto a print server, firstly you can install all the different Windows client drivers on the server so they are automatically deployed, and secondly it greatly simplifies the management of the printers.First of all you need to ensure that your Windows 2008 Server has the Print Services role installed, so logon to it and open the "Server Management" console, then click "Roles" in the left-hand pane:

The "Roles Summary" will list all the roles currently installed on your server, and if like above you don't see Print Services then you will need to add it by clicking the "Add Roles" link. This will start the "Add Roles Wizard", click Next past the introductory page and on the next one click to check the "Print & Document Services" role:

Click "Next" and the next page explains some of the basic principles of the Print Services role, once you've read it click "Next" and on the following page you are asked to select specifically which services you require. Here we only need "Print Server", which should already be ticked, unless you know you have a need for any of the other role services then leave them unticked. Click "Next" to take you to the confirmation page and then click "Install" to add the Print and Document Server role. The installation process should only take a minute or two and then you can click "Finish" to close the wizard. A restart of the server should not be required.
The Print Management Console
Now you have the Print Services role installed on your server you can use the Print Management console to perform all your printer administration tasks, so open it by going to Start - Administrative Tools - Print Management. Expand the Print Servers tree, then your server and click "Printers" to view the printers already installed:
Adding a Printer
If you need to install another printer then right-click on "Printers" in the left hand pane and select "Add Printer" to start the "Network Printer Installation Wizard". The procedure is very similar to the standard Windows Add Printer wizard - either add your printer by browsing the network or enter its IP address directly, and if you are fortunate then it will detect the printer type automatically and install the driver. By default the wizard will offer to share the printer on the network. It's unlikely you would want to uncheck this option but in the same window you can also provide additional information such as the printer location. Filling in these fields will make it easier for your users to identify the printer they wish to use, especially if you have several identical model printers on your network, so it is worth doing now. Repeat the process until you have added all the printers you wish to make available to your users and they should be listed in the central pane.Installing Additional Drivers
The secret of successful network printer sharing is getting the correct drivers on the server, then the process of deploying them to the client PCs will be completely automatic. Ideally you will have a brand new network with all 64bit Windows 7 desktops, in which case the standard Windows 2008 drivers are all you need, however this rarely occurs and it is far more likely that you will need to support a mixture of 32bit XP and Vista clients too. The most important thing to remember at this point is that all the version numbers for the printer's drivers must be the same, otherwise Windows will not accept them as being valid. Some manufacturers make this easier than others, for example HP are usually very good at clearly displaying the driver versions on their download page:
HP LaserJet 2015n - Windows Vista 64bit drivers

HP LaserJet 2015n - Windows Vista 32bit drivers
In the example above you will be fine if you download the PostScript driver package dated 4th June 2008 for both 64bit and 32bit versions, as the version numbers are identical. You need to be especially careful where your server already has a 64bit driver package installed, the best option is to download the latest version of both the 64bit and 32bit drivers, then you can ensure you have up to date and matching driver versions. Selecting the "Drivers" option in the Print Management console allows you to easily see what versions you have installed on your server, here you can see that we have the latest version of the PCL5 driver installed for our LaserJet 2015 both 32bit (x86) and 64bit (x64) Windows clients:

Should you need to add or remove printer drivers then the easiest way to do it is to right-click on "Drivers" in the left pane of the Print Management console and select "Manage Drivers" from the dropdown menu. This will open a new window listing all the drivers installed on your server, removing any one of them is simply a case of clicking to select it and then clicking the "Remove" button. Alternatively, to install a new driver click on the "Add" button to start the wizard:


Click "Next" on the introductory page and the next page will ask you to select what type of driver package you are installing - its unlikely you will have an Itanium system so the choice is likely to be between "x64" - 64bit drivers, or "x86" - 32bit drivers. Most driver packages will be specifically 32 or 64 bit, not both in one, so you should only have one box checked before you click "Next" to continue the wizard.

Extracting Printer Driver Files
Depending on the type of installation package supplied, there are several options available to you to get around this problem. The best solution being to revisit the manufacturer's website and try to locate standalone driver files. Some "consumer" type printers come with large installation packages which install additional applications as well as the driver, to be honest you are probably better off not trying to share one of these from your server as it isn't suitable for the task. With other packages, you may find that instead of running the "Setup" program you can browse to its folder and locate the necessary driver files hidden within it. These will include one or more ".inf" files that tell Windows the models of printer it supports.
You only have to make the driver files available to Windows for the "Add driver " process, it will then copy the files it needs to another location and retain them for future use. When you are subsequently installing the shared printer on any user desktops, the Windows OS should then be able to download the correct driver files from the server automatically.
Conclusion
Once you have added the printers and relevant drivers to your print server they will then be available to install on your client desktops using their "Add Printer" wizard. Should you only have a small number of users and/or printers, then this process should be easy enough to manage manually, but for larger deployments there are various automation methods available
Tag :
Exchange Server
Configuring Outgoing Email on Sharepoint 2010 Part-2

Go back to your Exchange Server where you’ll start by configuring a Receive Connector (remember that you configured a Send Connector in Part 1). Here’s that Incoming Send Connector again:

Creating a New Receive Connector
Note that the Send Connector was created under the Hub Transport settings of the Organization Configuration. Receive Connectors, on the other hand, fall under the Hub Transport settings of the Server Configuration. Go there now and, in the right-hand panel, click New Receive Connector.
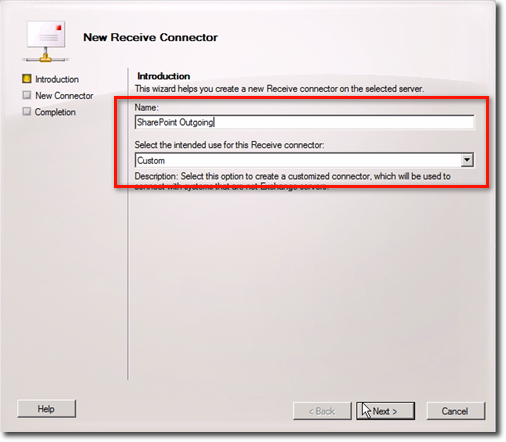
Give it a name and choose the intended use for that connector (e.g. Custom). Click Next.
Leave the Local Network settings as is. Click Next.

When you’re already in the Remote Network Settings window, select a range of IP addresses in the list box to change it. Basically, a single item is a range of IP addresses of servers from which mail will be received.

You’ll need to enter the IP address of the SMTP server (the SharePoint Server in this case) for the Start Address, as well as an End Address in case you have additional servers in play.

In the next window, click New to commence creation of the new connector.

When the process completes, click Finish.

You’ll then see your newly created Receive Connector. Right-click on it and select Properties.

Once inside the SharePoint Outgoing Properties window, navigate to the Permission Groups tab and check Anonymous users. Click OK.

Next, we’ll show you how to configure your outgoing email settings from Central Administration.
Configuring Outgoing Email settings from Central Administration
Go to a client system and launch SharePoint Central Administration from there. Navigate to System Settings > Configure outgoing e-mail settings.
In the set of text fields and drop-down list on the right, enter/select the following settings:
Click OK when done.


- Outbound SMTP server:
- From address:
- Reply-to address:
- Character set:
Click OK when done.

Testing the Outgoing Email feature - Creating and Managing an Alert
You’re now ready to try out the Outgoing Email feature. To give it a test run, let’s create your first alert. Go to your SharePoint site and select a list item. Next, navigate to the List tab and click Alert Me. Finally, click Set alert on this list.

In that list’s New Alert window, set the following configurations:
- Alert Title
Enter a suitable title for the alert
- Send Alerts To
Enter the user names or e-mail addresses of the people whom you would like to send alerts to. Include yourself just so you can verify if things go as expected.
- Delivery Method
Specify a delivery method. In this case, it’s just going to be e-mail.

- Change Type
Specify the type of changes you want to be alerted to. At this point, just select All changes.
- Send Alerts for These Changes
Specify whether to filter alerts based on specific criteria. At this point, just select Anything changes.
- When to Send Alerts
Specify how frequently you want to be alerted. At this point, just select Send notification immediately.

Click OK when done.
If you followed all those settings we suggested, you’ll be able to receive your first alert after you click the OK button. You can view the contents of the alert through Outlook.

You can then make changes to all your existing alerts by clicking the Alert Me button again and selecting Manage My Alerts.

In the succeeding screen, you’ll see all your existing Alerts. You can make changes to an alert by simply clicking on it.

To see the alerts feature in action one more time, let’s create a new item under the list which you activated an alert on. Navigate to the list in question and click Add new item.
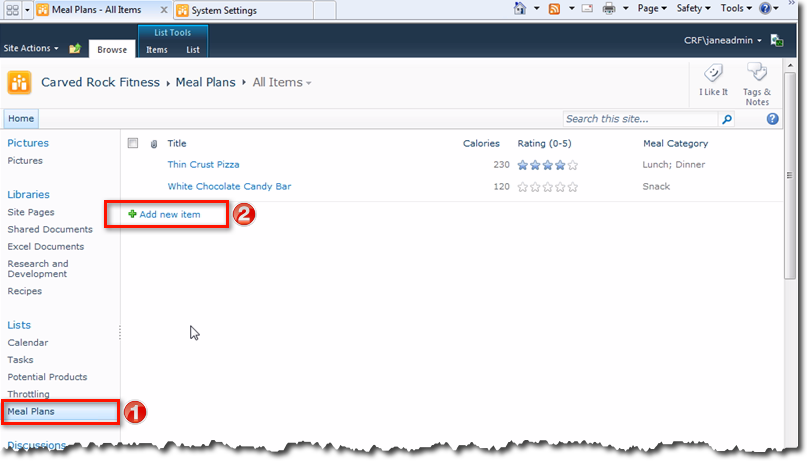
This item is just for testing purposes, so just fill in the necessary settings as you wish.

Again, right after you click Save, you’ll receive an email in Outlook alerting you of the newly created item.

As you can see, by configuring SharePoint for Outgoing Email, you’ll be able to receive alerts, which can be very useful in tracking changes in lists, libraries, and documents.
Configuring Outgoing Email for Web applications
There’s one more benefit we’d like to mention that’s still a result of configuring SharePoint for Incoming/Outgoing email. Go back to Central Administration and navigate to Application Management > Manage web applications.

If you select any of those web applications you have there and then click General Settings > Outgoing E-mail,

you’ll be able configure outgoing e-mail for that web application.

Notice that these are exactly the same configurations we encountered when we first configured our Outgoing E-mail settings. Notice also that the values you originally entered are taken as the default. You may change them to suit the specific outgoing email requirements of this web application. Click OK when you’re done.
Tag :
Exchange Server
Configuring Incoming Email on SharePoint 2010 Part-1

Introduction
There are certain benefits you can get from configuring your SharePoint system for incoming and outgoing emails.
For instance, with Incoming Email enabled in SharePoint, your teams members can automatically store the messages and attachments they send to other team members into lists and libraries without having to open your SharePoint site and doing a manual upload. This will help your organization move away from Public Folders.On the other hand, with Outgoing Email enabled, users can set alerts and use them to track various items such as lists, library items, and documents and be notified whenever changes to these items occur. It will also allow email administrators to receive messages regarding important system issues
Important Reminders Before Configuring Email
Before you set out to configure your SharePoint for incoming and outgoing email, there are some things you need to know.- SharePoint 2010, which is the version we’ll be referring to throughout this tutorial, relies on the SMTP service in Windows 2008 or Windows 2008 R2 for incoming email. Thus, that service will have to be enabled in SharePoint before anything else.
- SharePoint 2010 supports configurations from any SMTP service for sending outgoing email. However, for this tutorial, we’ll be using Exchange 2010 and we’ll be assuming it has already been set up as its own member server in your organization and ready for use.
- Finally, to work with Exchange 2010, you will have to configure send and receive connectors.
Enabling SMTP in SharePoint
Go to your SharePoint server and open the Server Manager. Next, click the Features node and then click the Add Features link.
This will launch the Add Features Wizard. In the Features list, scroll down until you find the item named SMTP Server. Click that.

A dialog box will then pop-up, asking you whether you want to add role services and features required for the installation of the SMTP Server. Click the Add Required Role Services button.

In the succeeding screens, just click the Next buttons until you reach the one that says Confirm Installation Selections, at which you’re supposed to click Install.


Barring any unforeseen hitches, you should reach the Installation Results screen with all items marked as Installation succeeded. If you did, click the Close button.

Configuring SMTP using the IIS 6.0 Manager
For you to be able to configure that SMTP service, the Internet Information Services (IIS) 6.0 Management Tools (a.k.a. IIS 6.0 Manager) should be installed on your Windows 2008 R2 Server. To see if they’re already there, navigate to Start > All Programs > Administrative Tools
If it hasn’t been installed yet, then just go to the Server Manager, click the Roles node, scroll down that large Roles pane on the right until you see the link called Add Role Services, and click that link.

In the Add Role Services window, scroll down the list of Role services until you reach the IIS 6 Management Compatibility items. Check the relevant items as shown on the screenshot below and proceed with the installation. Notice that the items are grayed. That’s because, in our system, the IIS 6.0 Management tools have already been installed. We just wanted to show you where to go should you discover that those tools haven’t been installed yet.

With the IIS 6.0 Manager already installed, you can already configure the SMTP service. Launch the IIS 6.0 Manager (we showed you where to find it earlier) and navigate to SMTP Virtual Server #1.

Most of the settings here may be left to their default values. However, you may click those tabs and change the property settings you find there to suit the needs of your organization. For instance, in the General tab, you may want to check Enable logging if you want to perform some troubleshooting.

After closing the SMTP Virtual Server #1 Properties window, select the Domains item that you see under SMTP Virtual Server #1. Next, right-click on the domain name of the SMTP virtual server found in the right panel and select Properties.

Select your desired location for the Drop directory. Of course, you may accept the default location if you want. Click OK when done.

You’re done with configuring the SMTP service. The next part is to ensure that the service will start automatically. To do that, go to Start > All Programs > Administrative Tools > Services.

Once the Services window is up, scroll down until you see the item named Simple Male Transfer Protocol (SMTP). Normally, its Startup Type will be set to Manual.

To change that to Automatic, double-click on the item in question to bring up its corresponding Properties window. Expand the drop-down list box beside the Startup type property and select Automatic. Click Apply, then OK.

Configuring SMTP on Exchange Server
Go to your Exchange Server and open up your Exchange Management Console. In the screenshot below, you’ll notice that, in our set up, we already created mailboxes for all our users. We’re going to assume you’ve also done that at your end.

The first thing to do here is to create a Send Connector. Navigate to the Organization Configuration on the left panel, select Hub Transport, and click the Send Connectors tab. Next, go to the Actions panel on the right and click New Send Connector.

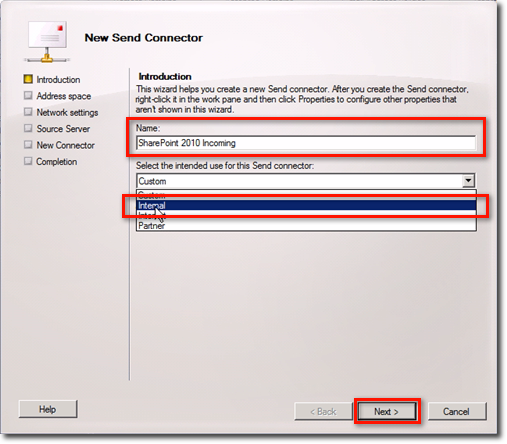
This will bring up the New Send Connector Introduction screen. Give the send connector a name, e.g. SharePoint 2010 Incoming, and specify its intended use, e.g. Internal. When done, click Next.
In the Address Space window, you’ll then be asked to specify the address space to which the connector will route mail. First, click the Add button.

Next, enter the address of the server that’s handling your SMTP service into the Address field. In this case, that server is your SharePoint server, so enter its address there. Click OK.

That will add the address space to the list in the Address Space window. Click Next.

To add a smart host, click the Add button.

When you start adding a smart host, you’ll be required to enter the IP address of the server that’s hosting your SMTP service. Again, this server is no other than your SharePoint server. But instead of entering the FQDN like you did earlier, which is given as the second option, it’s recommended that you enter the numeric IP address. This will give you a better chance of connecting in case certain connectivity problems occur in the future.

After clicking OK, you’ll see the IP address added to the list of smart hosts. Click Next.

In the succeeding window named Configure smart host authentication settings, just leave the option to None and click Next.

When you’re in the Source Server window, make sure your Hub Transport server is on that list. In a typical Exchange installation, which is what we have, a single Exchange server is set to handle all three roles (i.e., Mailbox, Client Access, and Hub Transport). So if you find your Exchange server there, chances are, you’re good to go. Click Next.

Finally, you’ll be shown a summary of your new Send Connector configurations. Click New.

This will create the new send connector. Once creation is complete, click Finish.


Configuring Active Directory to allow contacts to show up in the Outlook Address book
At this point, you will need to go to your Domain Controller and make some changes to Active Directory to allow contacts to be created within an organizational unit so that they show up in the Outlook Address Book after they are created.
Go to your Domain Controller and open the Active Directory Users and Computers.

First, create an Organizational Unit as shown.

Give the Organizational Unit a name (e.g. Sp Contacts), then click OK.

Next, change the permissions of that Organizational Unit by right-clicking it and selecting Delegate Control.

When the welcome screen of the Delegation of Control Wizard appears, click Next.

You will want to delegate control to the account that controls the SharePoint Central administration application pool, which, in this case, is the SP Admin account. Click the Add button.

Enter spadmin in the text field labeled “Enter the object names to select”, then click OK.

In the next screen, select its corresponding item and click Next.

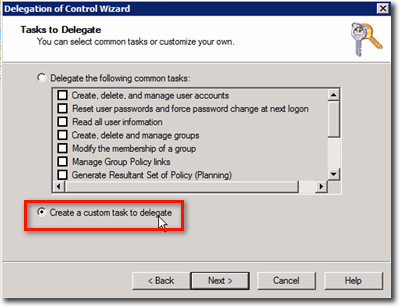
You’ll then be asked whether you want to delegate a set of common tasks or create a custom task to delegate. Select the second option and click Next.
When asked to indicate the scope of the task you want to delegate, select “This folder, existing objects in this folder, and creation of new objects in this folder.” Click Next.

In selecting the permissions you want to delegate, first check General and Creation/deletion of specific child objects. Then, in the Permissions list, check Create All Child Objects and Delete All Child Objects. Click Next.

If all goes well, you will have reached the end of the Delegation of Control wizard. If so, click Finish.

One last thing you need to do within Active Directory is to enable the SP Admin account with the Delete Subtree permission. To do that, go to the View menu and select Advanced Features.

This will show more items on the right-hand panel. Right-click on the SharePoint contacts organizational unit you created earlier and select Properties.

In the properties window, navigate to the Security tab and click the Advanced button.

In the Advanced Security Settings window, select the SPADMIN account.

This is where you will then find the Delete subtree permission. Check its Allow checkbox.

Click OK to close that window, then click the OK button of each window you encounter until you’re back to the Active Directory Users and Computers window.

Go back now to the SharePoint server. Right-click on the PowerShell quick-launch icon then click Run as Administrator.

When the dialog window appears, click Yes.

In the PowerShell, type in iisreset to start the reset process. Wait until the reset completes, then close the window.

Although you’re already done with this phase, the next few steps will still be performed in the SharePoint server environment, so keep it open.
Configuring Incoming Email Settings in Central Administration
You’re now ready to configure incoming email settings from inside Central Administration. To begin, launch the SharePoint Central Administration.

Once inside the Central Administration, go to the left side of the screen and click System Settings.

Under E-Mail and Text Messages (SMS), click Configure incoming e-mail settings.

- Enable sites on this server to receive e-mail?
- Settings mode:
- Use the SharePoint Directory Management Service to create distribution groups and contacts?

- Active Directory container where new distribution groups and contacts will be created:
OU=[ContainerName], DC=[domain], DC=[com],
wherein ContainerName is the name of the Organizational Unit you created earlier, domain is the second-level domain, and com is the top-level domain.
For example: OU=SP Contacts, DC=carvedrockfitness, DC=com
- SMTP mail server for incoming mail:
- Accept messages from authenticated users only?
- Allow creation of distribution groups from SharePoint sites?

- E-mail server display address:
- Select Accept mail from all e-mail servers

To do that, navigate to Start > Computer > C: > inetpub > mailroot. There you’ll find the drop folder.

Right-click on the Drop folder and select Properties.

When the Drop Properties window appears, navigate to the Security tab. Scroll down the list of Group or user names and see if the items “WSS_ADMIN_WPG...” and “WSS_WPG...” are present. If they are, then you’re good to go.

Before you can go to the main process of checking whether your SharePoint incoming email feature is working, you’ll need to perform just a few more configuration steps. Go now to a client system, open a Web browser and navigate to your SharePoint site.
Next, go to the Libraries section and click a link to a library (we assume you already have some in there). In our example, the library we’re about to open is called Recipes.

To change the settings of that library, go to the Library tab and click Library Settings.

Go to the Communications section and click the link named Incoming e-mail settings.

- Allow this document library to receive e-mail?
- E-mail address:
- Group attachments in folders?
- Overwrite files with the same name?

- Save original e-mail?
- Save meeting invitations?
- E-mail security policy:

When you’re done with all those settings, click OK. After that, the library whose settings you just configured will automatically be added as a contact under the Organizational Unit created earlier. This is now a result of all those numerous steps you went through.
Go now to Active Directory Users and Computers and navigate to the Organizational Unit in question (‘SP Contacts’, in our case). You should see the library there now.

You’ll also see that contact in Exchange Server. Go to Exchange Server now, launch the Exchange Management Console, and navigate to Recipient Configuration > Mail Contact. You should see the library contact there as well.

It’s finally payback time. You’re finally ready to perform a basic test on the feature you’ve taken so long to configure.
Get back to your client system, launch Microsoft Outlook, and create a New email.

In the To: field, enter the email address of the library that was newly added as a contact. Enter a subject, put some text into the body, attach a file, and send.

If you go back to the SharePoint site and open the library, you should be able to see both the email and the attached file. If they’re there, then heave a sigh of relief. This means, you have just accomplished what you have set out to do in the first part of this tutorial, and that is to configure SharePoint for Incoming Email.

Tag :
Exchange Server