Archive for 2011
Train Signal – VMware vSphere 5 Training

VMware vSphere 5
vExperts David Davis and Elias Khnaser team up to deliver the first video training course for the recently released version of VMware vSphere 5, the latest solution in a long and reputable line-up of virtualization solutions available.
What’s new in vSphere 5?
* Platform Enhancements
* New Storage and Networking
* New High Availability
* And more!
Professional Training
* Nearly 17 Hours (16 Hours, 41 Minutes, 21 Seconds) of VMware vSphere 5 Training Videos Jam Packed on 3 DVDs!
* Multiple File Formats Make it convenient for you to learn anywhere you go! iPod Video, Mp3 Audio, .WMV & high quality .AVI video
* PDF of Instructor Notes allow you to follow along with the videos and take more organized notes
* Instant Access Online to the entire training course
Exam Preparation
* Exam Coverage This course covers exam objectives required for you to pass:
o VCP-510 – VMware Certified Professional on vSphere 5 Exam
Download Links :-
VMware vSphere 5.Part02
VMware vSphere 5.Part03
VMware vSphere 5.Part04
VMware vSphere 5.Part05
VMware vSphere 5.Part06
VMware vSphere 5.Part07
VMware vSphere 5.Part08
VMware vSphere 5.Part09
VMware vSphere 5.Part10
VMware vSphere 5.Part11
VMware vSphere 5.Part12
Train Signal – Cisco CCNA Training Videos

Cisco CCNA Training Videos
Course Outline:
Lesson 1 – Introduction to CCENT
Lesson 2 – Introduction to Networking and the Networking Models
Lesson 3 – Ethernet Standards and Cable Types
Lesson 4 – Switching
Lesson 5 – Common Router and Switch Commands
Lesson 6 – IP Addressing and the Routing Process
Lesson 7 – ARP, DNS and DHCP
Lesson 8 – Memory Components and Config Files
Lesson 9 – Intro to Wireless Networks (WLANs)
Lesson 10 – Binary Math and Subnetting
Lesson 11 – Static Routing and RIP
Lesson 12 – Wide Area Networks (WANs)
Lesson 13 – Troubleshooting
Lesson 14 – Introduction to Network Security
Lesson 15 – Introduction to ICND2
Lesson 16 – Switching II
Lesson 17 – PTP WAN Links, HDLC, PPP, and Frame Relay
Lesson 18 – Static Routing and RIP
Lesson 19 – OSPF
Lesson 20 – EIGRP
Lesson 21 – IP Version 6 and NAT
Lesson 22 – VPNs and IPSec
Lesson 23 – ACLs and Route Summarization
Lesson 24 – Variable Length Subnet Masking
Download Links :
Cisco CCNA Training Videos.Part 2
Cisco CCNA Training Videos.Part 3
Windows 2003 Terminal Services

Windows 2003 Terminal Services
Terminal Services, known to some as an Admin’s best friend, uses RDP (Remote Desktop Protocol), relies on TCP/IP, and falls under the application layer of the ISO 7-layer model. It has been improved by offering more features, greater reliability and scalability in Windows 2003.
Introduction
Terminal Services, known to some as an Admin’s best friend, uses RDP (Remote Desktop Protocol), relies on TCP/IP, and falls under the application layer of the ISO 7-layer model. It has been improved by offering more features, greater reliability and scalability in Windows 2003.
Terminal Services allow:
1.the sharing of applications and desktops over the network
2.administrators to take control of, and manage, a computer from their desk
3.the centralization and management of applications (constantly keeping them up to date)
The ability to access a terminal server and establish a session via a Pocket PC, for example, is a great feature that would be handy for employees on the move. Terminal Server does not require the client to have a Microsoft Windows operating system in order to connect to it.
A 128 bit, RC4 bi-directional encryption method is used to secure the connection. Should the terminal services client not support such a high level of encryption, then lower levels can be set.
A few of the most sought after advantages include:
However, a disadvantage would include the fact that although Windows 2003 and Terminal Server offer load balancing, this can still be improved. The current system is based on network utilization and can handle up to 32 servers.
A very important feature which has been implemented is the way in which bandwidth is managed for a terminal services session. It has been improved to provide low-bandwidth connections (such as dial up) with better performance by only transmitting a screen view of the remote computer, rather than the actual data itself.
To benefit from these new features, the terminal services client must be using RDP 5.1 (included in Windows XP) and the server must have RDP 5.2 (included in Windows 2003).


Terminal Services allow:
1.the sharing of applications and desktops over the network
2.administrators to take control of, and manage, a computer from their desk
3.the centralization and management of applications (constantly keeping them up to date)
The ability to access a terminal server and establish a session via a Pocket PC, for example, is a great feature that would be handy for employees on the move. Terminal Server does not require the client to have a Microsoft Windows operating system in order to connect to it.
A 128 bit, RC4 bi-directional encryption method is used to secure the connection. Should the terminal services client not support such a high level of encryption, then lower levels can be set.
A few of the most sought after advantages include:
- Automatic re-connection of a disconnected session (useful for wireless connections)
- Smart Card Authentication support
- Automatic re-direction of client local and network mapped drives
- Automatic re-direction of Audio
- 24-bit color mode support
- Session Directory (stores a list of sessions indexed by username and server to allow automatic re-connection from a disconnected session, in a terminal server farm environment)
However, a disadvantage would include the fact that although Windows 2003 and Terminal Server offer load balancing, this can still be improved. The current system is based on network utilization and can handle up to 32 servers.
A very important feature which has been implemented is the way in which bandwidth is managed for a terminal services session. It has been improved to provide low-bandwidth connections (such as dial up) with better performance by only transmitting a screen view of the remote computer, rather than the actual data itself.
To benefit from these new features, the terminal services client must be using RDP 5.1 (included in Windows XP) and the server must have RDP 5.2 (included in Windows 2003).
Setting up Windows 2003 as a Terminal Server
Open the ‘configure your server’ wizard from Administrative Tools and in the select a role section, choose Terminal Server and click Next twice to confirm your actions. The wizard will then start to install the required files and warn you that the machine will have to be restarted during the installation process. Close any open programs and click OK.

The installation will continue for a few minutes before the machine is restarted. After the machine has booted and you logon, you are presented with a confirmation screen that states the computer is now a terminal server.

It is important to take note that a 120-day evaluation period has been allocated for unlicensed clients. If you do not obtain a license within that period then terminal services clients will no longer be able to initiate a session.
Licensing
This is probably where the most changes have been made. Microsoft have introduced a ‘per user’ license to add to the already familiar ‘per device’ method.
To make your machine a terminal server license server you will have to install it separately. This can be done from the windows components wizard section in the add/remove window from the control panel.
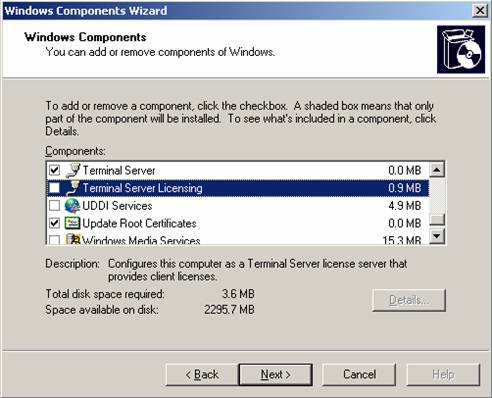
Once you have installed this option your server will be listed in the terminal server licensing console.
You will have to activate the server before it can start distributing licenses. Activation of the licensing server can be done via a direct connection to the internet, a web browser or over the telephone. The following is a screenshot of the terminal server licensing console demonstrating what you would have to do to start the activation process.
You will have to activate the server before it can start distributing licenses. Activation of the licensing server can be done via a direct connection to the internet, a web browser or over the telephone. The following is a screenshot of the terminal server licensing console demonstrating what you would have to do to start the activation process.

This will bring up a wizard asking you to enter details and select options to suite your needs.
Follow the on screen instructions and press Finish when you are done.
Follow the on screen instructions and press Finish when you are done.
Terminal Server Configuration
The two main applications used to configure the terminal server are:
(They can both be found in the administrative tools folder in control panel or on the start menu).
When you select the server name you can choose to view and manage the Users, Sessions or Processes tab. The green icons indicate that the server is online. If you had to disconnect it, the icons would be gray.
The Users tab allows you to see who is connected, how long they have been connected and the state of their connection. If you select a user and right click you can disconnect or reset the user’s session, send a message (which will be displayed as a pop-up message box on the client side), view the status or log the person out of the terminal server session.
The Sessions tab permits the viewing and control of the terminal server sessions. You can right click a session and select the status to see the incoming and outgoing data or reset to reset the session.
The processes tab shows all the processes that are running and which user they belong to (this is a simplified version of the processes tab found on the windows task manager).
Select a user, click the right mouse button and choose ‘end process’ to kill the process.
The image below shows the Terminal Services Manager with an active connection initiated by a user (andrew).
 If you select the RDP-Tcp#12 (username) option you can view the processes and session information specific to that user. Note: The #12 number will be different for each session.
‘Favorite servers’ will list all the servers that you have added as a favourite - you can do this by right clicking a server and selecting ‘add to favorites’.
You are able to connect to multiple terminal servers by press Actions > Connect to computer. These will be listed in the ‘All Listed Servers’ node.


The server settings section enables you to modify the settings of the server. Double click a setting from the list to bring up the appropriate window and be given the option to make a change.
 Each setting shown in the above window is self explanatory. The settings in the list each have an attribute which you can set according to your preferences.
Terminal Services give you the opportunity to provide a secure and reliable tool to employees. Microsoft has built on the success of Terminal Server in Windows 2000 and come up with new solutions to meet user’s needs.
Better manageability and user friendliness are just two of the improved features worth mentioning. You have just been reading Part one of an article based on terminal services. Part two will be released next week. It will include troubleshooting potential logon problems, terminal services tips and a guide on how to log on to a terminal server from a Windows client.
This section will be of interest to terminal server administrators and clients. It includes a step-by-step guide of how to logon to a terminal server, troubleshooting common logon problems, and a tips section.
A Windows 2003 Terminal Server can be accessed by a windows client that has Remote Desktop Connection installed or via a web browser (remote desktop web connection).

(They can both be found in the administrative tools folder in control panel or on the start menu).
- Terminal Services Manager (completely re-written in Windows 2003)
- Terminal Services Configuration
When you select the server name you can choose to view and manage the Users, Sessions or Processes tab. The green icons indicate that the server is online. If you had to disconnect it, the icons would be gray.
The Users tab allows you to see who is connected, how long they have been connected and the state of their connection. If you select a user and right click you can disconnect or reset the user’s session, send a message (which will be displayed as a pop-up message box on the client side), view the status or log the person out of the terminal server session.
The Sessions tab permits the viewing and control of the terminal server sessions. You can right click a session and select the status to see the incoming and outgoing data or reset to reset the session.
The processes tab shows all the processes that are running and which user they belong to (this is a simplified version of the processes tab found on the windows task manager).
Select a user, click the right mouse button and choose ‘end process’ to kill the process.
The image below shows the Terminal Services Manager with an active connection initiated by a user (andrew).

‘Favorite servers’ will list all the servers that you have added as a favourite - you can do this by right clicking a server and selecting ‘add to favorites’.
You are able to connect to multiple terminal servers by press Actions > Connect to computer. These will be listed in the ‘All Listed Servers’ node.
Terminal Services Configuration
The screenshot below is that of the Terminal Services Configuration.
Any connections that have been setup will be displayed in the connections part of the console. Double click a connection to open the properties page.

The server settings section enables you to modify the settings of the server. Double click a setting from the list to bring up the appropriate window and be given the option to make a change.

Terminal Services give you the opportunity to provide a secure and reliable tool to employees. Microsoft has built on the success of Terminal Server in Windows 2000 and come up with new solutions to meet user’s needs.
Better manageability and user friendliness are just two of the improved features worth mentioning. You have just been reading Part one of an article based on terminal services. Part two will be released next week. It will include troubleshooting potential logon problems, terminal services tips and a guide on how to log on to a terminal server from a Windows client.
A Windows 2003 Terminal Server can be accessed by a windows client that has Remote Desktop Connection installed or via a web browser (remote desktop web connection).
Troubleshooting Logon Problems
Apart from the obvious logon error of typing in a wrong username or password, there exists two common problems that users come across when logging on. These are shown below.

This error indicates that the group policy of the terminal server does not allow you to logon interactively. The settings will have to be changed from the group policy object editor by your administrator.
To do this, open gpedit.msc and navigate to the following section:
Local Computer Policy > Computer Configuration > Windows Settings > Security Settings > Local Policies > User Rights Assignment
and after double clicking on the “Allow Log on Locally” from the Policy list, choose the user that you want to grant local log on access to and press OK. The image below indicates which section must be clicked on.

The error message below means that you do not have access to logon to the terminal services session because your account has not been given the effective permissions from the terminal services manager on the server.
To correct this, open the Terminal Services Configuration, double click the RDP option in the main window and go to the permissions tab. Select Add and choose your account before pressing OK and assigning the right permissions to that account. Now attempt to logon again with that user account.

Terminal Services Client Logon - A step-by-step guide
Web Client
The terminal services web client will allow you to logon to a terminal server from your web browser. This is very handy as it provides quick and easy access from anywhere.
Open your web browser and in the address bar type the following details:
http://server_name/tsweb
where server_name is the name of the terminal server (this can also be the IP address). If the WWW service and the tsweb website has been started on the server then you will be directed to a page like the one seen below:


The image below shows the general tab of the Remote Desktop Connection window, which was expanded by pressing the Options >>> button on the original window.
 In this tab you can save your connection settings for future use, specify which computer you want to connect to and supply the logon credentials. The other tabs are used for performance related options like the display size and colour, speed and placement of resources.
Once you have entered the correct logon details press connect to initiate the session. It is likely that you will be asked to re-enter the logon credentials – unless the administrator has disabled the option from the terminal server.
Open your web browser and in the address bar type the following details:
http://server_name/tsweb
where server_name is the name of the terminal server (this can also be the IP address). If the WWW service and the tsweb website has been started on the server then you will be directed to a page like the one seen below:

Enter the name of the server you want to connect to and choose the size of the screen before clicking ‘connect’. If you do not already have the required ActiveX component installed then you will be prompted to install it – click Yes when the window pops up and asks you to confirm the setup. In my example I have chosen for the screen to use a 800x600 display size. The web browser will act as a place holder for the terminal services screen to be displayed, as shown in the following screenshot.

Remote Desktop Connection
Remote Desktop Connection is installed by default on Windows XP- but can also be downloaded as a separate application from the Microsoft website. This is used to initiate a terminal services session from the client side. To open it type mstsc in the run box or navigate to Accessories > Communications on the Start menu. The image below shows the general tab of the Remote Desktop Connection window, which was expanded by pressing the Options >>> button on the original window.

Once you have entered the correct logon details press connect to initiate the session. It is likely that you will be asked to re-enter the logon credentials – unless the administrator has disabled the option from the terminal server.
7 Clever Google Tricks Worth Knowing
Below I have compiled a list of 7 clever Google tricks that I believe everyone should be aware of. Together I think they represent the apex of the grand possibilities associated with Google search manipulation tricks and hacks. Although there are many others out there, these 7 tricks are my all-time favorite. Enjoy yourself.
1. Find the Face Behind the Result –
This is a neat trick you can use on a Google Image search to filter the search results so that they include only images of people. How is this useful? Well, it could come in handy if you are looking for images of the prominent people behind popular products, companies, or geographic locations. You can perform this search by appending the code &imgtype=face to the end of the URL address after you perform a standard Google Image search.
2. Google + Social Media Sites = Quality Free Stuff –
If you are on the hunt for free desktop wallpaper, stock images, Wordpress templates or the like, using Google to search your favorite social media sites is your best bet. The word “free” in any standard search query immediately attracts spam. Why wade through potential spam in standard search results when numerous social media sites have an active community of users who have already ranked and reviewed the specific free items that interest you. All you have to do is direct Google to search through each of these individual social media sites, and bingo… you find quality content ranked by hundreds of other people.
3. Find Free Anonymous Web Proxies –
A free anonymous web proxy site allows any web browser to access other third-party websites by channeling the browser’s connection through the proxy. The web proxy basically acts as a middleman between your web browser and the third-party website you are visiting. Why would you want to do this? There are two common reasons:
4. Google for Music, Videos, and Ebooks -
Google can be used to conduct a search for almost any file type, including Mp3s, PDFs, and videos. Open web directories are one of the easiest places to quickly find an endless quantity of freely downloadable files. This is an oldie, but it’s a goodie! Why thousands of webmasters incessantly fail to secure their web severs will continue to boggle our minds.
5. Browse Open Webcams Worldwide –
Take a randomized streaming video tour of the world by searching Google for live open access video webcams. This may not be the most productive Google trick ever, but it sure is fun! (Note: you may be prompted to install an ActiveX control or the Java runtime environment which allows your browser to view certain video stream formats.)
6. Judge a Site by its Image –
Find out what a site is all about by looking at a random selection of the images hosted on its web pages. Even if you are somewhat familiar with the target site’s content, this can be an entertaining little exercise. You will almost surely find something you didn’t expect to see. All you have to do is use Google’s site: operator to target a domain in an image search.
7. Results Based on Third-Party Opinion -
Sometimes you can get a better idea of the content located within a website by reading how other websites refer to that site’s content. The allinanchor: Google search operator can save you large quantities of time when a normal textual based search query fails to fetch the information you desire. It conducts a search based on keywords used strictly in the anchor text, or linking text, of third party sites that link to the web pages returned by the search query. In other words, this operator filters your search results in a way such that Google ignores the title and content of the returned web pages, but instead bases the search relevance on the keywords that other sites use to reference the results. It can add a whole new dimension of variety to your search results.
Bonus Material:
Here is a list of my favorite Google advanced search operators, operator combinations, and related uses:
1. Find the Face Behind the Result –
This is a neat trick you can use on a Google Image search to filter the search results so that they include only images of people. How is this useful? Well, it could come in handy if you are looking for images of the prominent people behind popular products, companies, or geographic locations. You can perform this search by appending the code &imgtype=face to the end of the URL address after you perform a standard Google Image search.
- Examples (notice the differences in each URL):
2. Google + Social Media Sites = Quality Free Stuff –
If you are on the hunt for free desktop wallpaper, stock images, Wordpress templates or the like, using Google to search your favorite social media sites is your best bet. The word “free” in any standard search query immediately attracts spam. Why wade through potential spam in standard search results when numerous social media sites have an active community of users who have already ranked and reviewed the specific free items that interest you. All you have to do is direct Google to search through each of these individual social media sites, and bingo… you find quality content ranked by hundreds of other people.
- Examples:
3. Find Free Anonymous Web Proxies –
A free anonymous web proxy site allows any web browser to access other third-party websites by channeling the browser’s connection through the proxy. The web proxy basically acts as a middleman between your web browser and the third-party website you are visiting. Why would you want to do this? There are two common reasons:
- You’re connecting to a public network at a coffee shop or internet café and you want privacy while you browse the web. You don’t want the admin to know every site you visit.
- You want to bypass a web content filter or perhaps a server-side ban on your IP address. Content filtering is common practice on college campus networks. This trick will usually bypass those restrictions.
- Examples:
4. Google for Music, Videos, and Ebooks -
Google can be used to conduct a search for almost any file type, including Mp3s, PDFs, and videos. Open web directories are one of the easiest places to quickly find an endless quantity of freely downloadable files. This is an oldie, but it’s a goodie! Why thousands of webmasters incessantly fail to secure their web severs will continue to boggle our minds.
- Examples:
- Find Music: -inurl:(htm|html|php) intitle:”index of” +”last modified” +”parent directory” +description +size +(wma|mp3) “Counting Crows”
- Find Videos: -inurl:(htm|html|php) intitle:”index of” +”last modified” +”parent directory” +description +size +(mpg|wmv) “chapelle”
- Find Ebooks: -inurl:(htm|html|php) intitle:”index of” +”last modified” +”parent directory” +description +size +(pdf|doc) “george orwell 1984″
- More info.
5. Browse Open Webcams Worldwide –
Take a randomized streaming video tour of the world by searching Google for live open access video webcams. This may not be the most productive Google trick ever, but it sure is fun! (Note: you may be prompted to install an ActiveX control or the Java runtime environment which allows your browser to view certain video stream formats.)
- Examples:
- Axis Webcams: inurl:/view.shtml or inurl:view/index.shtml
- Cannon Webcams: sample/LvAppl/
- MOBOTIX Webcams: control/userimage.html
- FlexWatch Webcams: /app/idxas.html
- JVC Webcams: intitle: intitle:”V.Networks [Motion Picture(Java)]”
- More info. - More info.
6. Judge a Site by its Image –
Find out what a site is all about by looking at a random selection of the images hosted on its web pages. Even if you are somewhat familiar with the target site’s content, this can be an entertaining little exercise. You will almost surely find something you didn’t expect to see. All you have to do is use Google’s site: operator to target a domain in an image search.
7. Results Based on Third-Party Opinion -
Sometimes you can get a better idea of the content located within a website by reading how other websites refer to that site’s content. The allinanchor: Google search operator can save you large quantities of time when a normal textual based search query fails to fetch the information you desire. It conducts a search based on keywords used strictly in the anchor text, or linking text, of third party sites that link to the web pages returned by the search query. In other words, this operator filters your search results in a way such that Google ignores the title and content of the returned web pages, but instead bases the search relevance on the keywords that other sites use to reference the results. It can add a whole new dimension of variety to your search results.
- Examples (notice the added variety between search results):
- allinanchor:”google hacks” vs. basic search for Google hacks
- allinanchor:”wordpress exploits” vs. basic search for Wordpress exploits
- More info.
Bonus Material:
Here is a list of my favorite Google advanced search operators, operator combinations, and related uses:
- link:URL = lists other pages that link to the URL.
- related:URL = lists other pages that are related to the URL.
- site:domain.com “search term = restricts search results to the given domain.
- allinurl:WORDS = shows only pages with all search terms in the url.
- inurl:WORD = like allinurl: but filters the URL based on the first term only.
- allintitle:WORD = shows only results with terms in title.
- intitle:WORD = similar to allintitle, but only for the next word.
- cache:URL = will show the Google cached version of the URL.
- info:URL = will show a page containing links to related searches, backlinks, and pages containing the url. This is the same as typing the url into the search box.
- filetype:SOMEFILETYPE = will restrict searches to that filetype
- -filetype:SOMEFILETYPE = will remove that file type from the search.
- site:www.somesite.net “+www.somesite.net” = shows you how many pages of your site are indexed by google
- allintext: = searches only within text of pages, but not in the links or page title
- allinlinks: = searches only within links, not text or title
- WordA OR WordB = search for either the word A or B
- “Word” OR “Phrase” = search exact word or phrase
- WordA -WordB = find word A but filter results that include word B
- WordA +WordB = results much contain both Word A and Word B
- ~WORD = looks up the word and its synonyms
- ~WORD -WORD = looks up only the synonyms to the word
Tag :
Google
Exchange Server 2007: Anti-Spam and Anti-Virus Protection
Anti-Spam and Anti-Virus Protection
Its predecessor, the Exchange Server 2003, had limited protection against spam and viruses, which is a major issue for small to medium size businesses who host their own messaging servers. Exchange Server 2007 has made some key improvements in this area, and just in time.
Anti-Spam and Anti-Virus protection is carried out by the Edge Transport Server formerly called the Gateway Server.
The Edge Transport Server is deployed as a stand-alone server providing a single point of contact to the outside (i.e. the Internet) which substantially decreases possible security holes effecting the inside network.
The Edge Transport Architecture
The diagram above illustrates how transport agents get incorporated into the Edge Transport architecture. At various stages of message processing, transport events take place to perform spam filtering, virus scanning, and other security tasks.
Multiple Edge Transport Servers can be deployed to provide fail-over redundancy and SMTP traffic load balancing for high traffic messaging environments.
Protecting messaging services from spam, viruses and malware requires a multi-layered, multi-pronged and multi-faceted approach. Understanding the process that is applied to incoming and outgoing messaging data will help those of you who are technicians and administrators to deploy, maintain, and upgrade the components required to protect users and networks form these threats.
Anti-Spam and Anti-Virus is provided by several agents on the Edge Transport Server. These modules act on or filter messages as they are processed by the message transport components.
Inbound SMTP Sessions
Connection Filtering
Once the edge server is contacted by an outside server to initiate a SMTP session, connection filtering is applied to determine if the sending agents IP address is hostile (blocked) or friendly (allowed). The IP address of the sending server is always available as it is a basic component of the session connection. The IP address is filtered through IP block/allow list and via providers block/allow list. The result will either end the session or allow the message to continue to the next filtering stage.
Sender Filtering
Next the “MAIL FROM:” is compared to a list of sender or sender domains blocked list. This list is built up by the administrator of the network and contains senders which have been banned from sending email to the organization. The process described above repeats, and if matched the session is terminated if not the message continues onto the next filter.
Recipient Filtering
The “RCPT TO:” is compared to both an admin defined block recipient list, and the local mail accounts list. If the block list is matched the session is terminated; if the message is not blocked and there is no local mail address the message can either be rejected or continue onto a general (catch all) mail box such as admin@domain or info@domain.
Sender ID
This filter is used to combat spoofed messages which would allow a hostile message to transverse the connection and sender filters. DNS servers are programmed with sender policy framework (SPF) records which identify the outgoing mail servers for a particular domain. The Sender ID filter compares the message header with the SPF record and rates the message accordingly. Because this filter cannot explicitly determine a friendly of hostile message, it is programmable to either allow or deny messages which have resulted in undetermined or failed Sender ID validation.
Content Filtering
This is where things get a little complicated. Content filtering is performed by proprietary technology programs which attempt to identify or differentiate valid or spammed content. You can equate content filtering of email to the process of speech recognition, of speech to text engines. Most content is correctly identified, but there is always a margin of error and also a learning curve. Content filters need to constantly adapt to external changes and may work very well one week and not so well the next time.
First the message is compared to five conditions: IP allow list, recipients not filtered, anti-spam bypass enabled, sender on safe senders list, and sender is on not filtered list. If any of these conditions are true then the message will bypass the content filter and the attachment filter and will be scanned for viruses. If the message does not meet any of the five conditions it is scanned by the content filter.
Content filtering on exchange servers currently uses Microsoft’s Smart Screen technology which employs the Intelligent Message Filter. There are a few things about this technology that admins should be aware of. First, the filter requires constant updates as new spamming techniques are introduced constantly. Second, although Microsoft claims that this technology is very accurate, it also has a built in spam quarantine function to temporarily hold spam identified messages, just in case the filter has mistaken a valid email as spam.
The content filter also uses a safelist aggregation feature which uses data from end users anti-spam safe list to determine if a message requires further scanning or is exempt from the content filter. The content filter applies a Spam Confidence Level (SCL) rating to the message. Depending on the SPL threshold levels the filter will either silently delete the message, reject the message at the SMTP level, send the message to the spam quarantine mail box, or pass the message to the next filter.
Sender Reputation
Sender Reputation assigns a Sender Reputation Level to a message that is then compared to threshold levels set by the admin to determine how a message should be treated. Sender Reputation holds persistent data about individual senders including HELO/EHLO analysis, reverse DNS lookup, SCL ratings and open proxy test. SR processes the messages at the “MAIL FROM” command only if the message has been acted upon by the Connection, Sender, Recipient, or Sender ID filters. The SRL will also be recalculated for a sender after the EOD command as other anti-spam agents will have updated the persistent data.
Attachment Filtering
If there are any attachments associated with the message, the attachment filter compares the attachment file name, extension or MIME content type and can be programmed to either delete the message, strip off the attachment or pass the message.
Anti-Virus Scanning
Of course all messages must be scanned for viruses even if the message is from allowed senders. Exchange Server 2007 uses Microsoft’s Forefront Security anti-virus package. Messages are scanned and if a virus is detected the message is deleted and notification is sent to the recipient.
Finally the message is sent to the recipients email box where Outlook’s Junk Email Filter compares its assigned SCL to threshold levels and either sends it to the recipient’s inbox or the junk mail box.
Finally the message is sent to the recipients email box where Outlook’s Junk Email Filter compares its assigned SCL to threshold levels and either sends it to the recipient’s inbox or the junk mail box.
Overview of Exchange Server 2010 Unified Messaging

Exchange Server 2010 Unified Messaging
In this overview I’ll outline the many features of Unified Messaging for you to look for when using this service. However, let’s first start by analyzing why it is worth using for your company and the advantages it offers over just the bare Microsoft Exchange 2010 application.
Benefits of Exchange 2010 Unified Messaging
As you probably know, Microsoft Exchange 2010 is integrated with Outlook. It allows each employer to connect to a server application and stay connected. Contact keeping and e-mail messaging are its trademark services. However, many companies also rely on voicemails to keep in touch with clients and for employees to communicate remotely. This is why Unified Messaging is such a powerful tool for any Exchange 2010 user. If you want to integrate voicemail and e-mail messages into a format that is easy to navigate, then you need to integrate Unified Messaging into your company’s workflow.According to Microsoft TechNet, “Microsoft Exchange Server 2010 Unified Messaging (UM) combines voice messaging and e-mail messaging into a single messaging infrastructure.”
The service implementation involves users accessing voice messages either through mp3 files from their inboxes or through a text format (we will go more in-depth about these features below). Compatibility includes telephones, mobile phones, Macs and PCs. TechNet describes the implementation process:
“After Unified Messaging servers have been deployed on a network, users can access their messages using Outlook Voice Access, from any telephone, from a mobile phone, or from the computer.”
This is an optional service for anyone who owns the standard Exchange 2010 application with no additional up-front costs. Exchange 2010 Unified Messaging has a couple standout features, like conversions of voice to text inputs, as well as great security. It fuses voicemails and e-mail into a single format that allows easier access and record keeping.
Here are some aspects of Unified Messaging worth noting:
1.Voicemail and email messages consolidated into a universal inbox
2.Voicemail preview that allows you to read your voicemail messages
3.Customized greetings and call transfer options to reduce the likelihood of missing an important call
4.Removes the need to purchase or manage a separate voicemail system
Exchange 2010 Unified Messaging isn’t just based on voicemail management. It also features voicemail security, auto attendant features, and more flexibility over answering phone calls. Here is a list of features and functions that may help your business operate more efficiently if you decide to use this service.

Voicemail Preview
This voicemail preview function is what makes Exchange 2010 Unified Messaging really stand out and come highly recommended for enterprise users. This allows users to either listen to voicemails or read them in text format from their e-mail mailboxes. By reading some of the text of a voicemail, users can save time by not having to listen to every voicemail in order. They will also know exactly which voicemail to jump to because of search functions and descriptions present in the text. Using this feature, Exchange 2010 creates a text version of voicemail that is sent with an MP3 file to the user’s e-mail inbox.Outlook Voice Access
Another one of UM’s features is called “Outlook Voice Access.” This feature is related to the Microsoft Outlook app and gives users control over their inboxes. It allows users to have “anywhere access” to their mailboxes even if they do not have an online connection present. This feature prevents the worry for employees not being able to manage their calendar, contacts and e-mail when disconnected or simply traveling to where an Internet connection may not be available. Voice commands or telephone keypads are both supported.

Message Waiting Indicator
“Message Waiting Indicator” (MWI) is a feature worth noting that deals with new or unread voicemails. This feature provides users warning messages saying they have unread voicemails available. It should be quite handy for enterprise users who do not have time to check their voicemail periodically and do not want to miss important calls.Protected Voicemail
This is a permission and security feature that gives administrative users greater control in regards to voicemail answering and forwarding. It uses a service called “Active Directory Rights Management Services.” This service allows Exchange to deny forward permissions to voice messages as designated either by the sender or administrative police. The sender can mark the message as private himself or allow the administrator to design certain privacy rules.Auto Attendant
The “Unified Messaging Auto Attendant” feature deals with contact information gathering. Callers can find information about the person they are trying to reach with this feature. They can do this by either using the keypad or with speech inputs and voice recognition. Using either method, they can locate a specific user and call them. The Auto attendant feature also allows users to create custom menus for callers, define information greetings, define business hours greetings, and define standard greetings. Users can even set up holiday schedules and enable external users to call the operator. The auto attendant feature gives greater control to messaging, greetings, answering calls, and reaching clients.Call Answering Rules
This feature allows users to be able to let clients and co-workers know how and when to reach them. Answering phone calls in order of importance is very important to many enterprise professions. Call answering rules allow users of Unified Messaging greater flexibility in answering or sending calls. These answering rules deal with custom greetings, Find-Me, call transfer options, and voicemail prompts. Various conditions can also apply to these rules that include caller IDs, time of day, and Exchange status (busy or free).Play on Phone
This feature allows users to check voice messages over telephones, and not just when using computing devices. A great advantage of using a telephone function such as this is privacy. Users may want to listen to voicemails privately and over a phone rather than through their system. Every type of telephone and handset is supported regardless of location; this includes mobile and home phones as well.Voicemail Form
This feature resembles the default e-mail form and gives users an interface for stopping voice messages, pausing voice messages, playing voice messages on a phone, as well as editing notes to voice messages. An embedded Windows Media Player and an audio notes field are included with this feature.Conclusion
Many companies today manage their voice messaging and e-mail services separately. IT admins also have to deal with managing voicemail and e-mail as separate services with separate servers. By consolidating voicemail with e-mail services, servers are freed up to concentrate on other tasks — or less have to be hosted. Other advantages include less multitasking involved for admins and greater compatibility to hardware devices for end users (since they are unified in a system that is compatible across hardware). Compatibility to other devices that connect to the voicemail is also strong, as much so as separate voice messaging services.
Tag :
Exchange Server
Understanding Microsoft SQL Server 2005 System Databases

Microsoft SQL Server 2005 System Databases
A database server application such as Microsoft SQL Server 2005 uses a lot of information in order to operate. Considering the purpose of a database is to store information, it only makes sense that SQL Server dips into its own technology for storing and accessing the information required for operating in a set of its own databases. Each of the databases used plays a specific role in the operation of the SQL Server. The system databases use the same components of databases created by users with: tables, views, stored procedures, and other database objects
Microsoft SQL Server 2005 uses five system databases:
- master – uses master.mdf for data and masterlog.ldf for logging
- model – uses model.mdf for data and modellog.ldf for logging
- msdb – uses msdbdata.mdf for data and msdblog.ldf for logging
- resource – uses mssqlsystemresource.mdf for data and mssqlsystemresource.ldf for logging
- tempdb – uses tempdb.mdf for data and templog.ldf for logging
A default installation of SQL Server stores all the system databases under
Here’s a Closer Look at Each System Database …
The master Database
The master database stores all the system-level information for SQL Server. The data stored by the master database includes information for: configuration settings, logon accounts, linked servers and endpoints, user database file locations, and properties. Due to the nature of the data stored, SQL Server cannot operate without the master database. So it is a very good idea to backup this database after changing the SQL Server configuration, modifying, adding, or removing any databases.
The model Database
SQL Server uses the model database for creating new databases. When the “create database” statement is used, SQL Server copies the contents of the model database to the newly created database. If there are any common database objects that would prove useful in all databases created by SQL Server, it is possible to add those objects to the model database. Then when a database is created by the SQL Server instance, the user defined objects will be copied to it along with the default objects. Since SQL Server recreates the tempdb database every time it is started, the model database is required in order for SQL Server to start. The msdb Database
The msdb database is used by SQL Server to store information on operations performed by SQL Server. This includes information for: the SQL Server Agent, Database Mail, the Service Broker, log shipping, backup, and maintenance plan job parameters. The resource Database
The resource system database was introduced with SQL Server 2005. This database is used for storing all the system views and stored procedures. Logically, each SQL Server database will contain all these system objects, however, they are physically stored within the resource database. The resource database is read-only and does not include any user data. In previous versions of SQL Server, the system objects were stored in the master database. The motivation behind moving the objects to a separate database is to make updating the SQL Server more efficient. Improvements and fix-ups to the SQL Server system generally manifest mostly on the system objects. A separate database to store the system objects reduces the number of files that need to be replaced with an update.
The tempdb Database
As the name implies, SQL Server uses the tempdb database for storing temporary data and data objects. The tempdb database is used when an operation requires a temporary table, stored procedure, or other database object to be performed. Intermediary data for large sort operations is also stored in the tempdb database as well as temporary data for internal SQL Server operations. Every time SQL Server is restarted, the tempdb system database is recreated thus clearing any temporary data stored during the last SQL Server session. In cases where a high volume of users and operations are performed with SQL Server the tempdb database can grow to use a significantly large amount of disk space. It is important to plan accordingly in these scenarios since running out of disk space where the tempdb database is stored will have catastrophic effects on the operation of SQL Server.
System Database Maintenance is Essential …
SQL Server’s system databases are crucial to the operation of SQL Server. If any of the system databases were to become corrupted, chances are SQL Server will no longer be able to function. For this reason it is just as important (if not more important) that you backup the system databases as regularly as the user databases. This applies to all the system databases except for the tempdb and resource databases. Users are restricted from performing many operations on the system databases such as: changing the database owner, dropping the guest user, or mirroring. The databases cannot be dropped or set to offline, nor do the database files support renaming.
Tag :
SQL/Oracle
Installing and Configuring Distributed File Systems (DFS) in Windows Server 2008

Distributed File Systems
The first is the benefit of being able to have one Namespace that all users can use, no matter what their location, to locate the files they share and use.
The second is a configurable automatic replication service that keeps files in sync across various locations to make sure that everyone is using the same version.
Let’s take a look at these two very important aspects of DFS.
DFS NameSpaces –
Each namespace appears as a folder with subfolders underneath.
The trick to this is that those folders and files can be on any shared folder on any server in your network without the user having to do any complicated memorization of server and share names. This logical grouping of your shares will also make it easier for users at different sites to share files without resorting to emailing them back and forth.
DFS Replication –
This service keeps multiple copies of files in sync.
Why would you need this? Well if you want to improve performance for your DFS users you can have multiple copies of your files at each site. That way a user would be redirected to the file local to them, even though they came through the DFS Namespace. If the user changed the file it would then replicate out to keep all copies out in the DFS Namespace up to date. This feature of course is completely configurable.
What’s New in DFS Server 2008?
Distributed File System in Server 2008 has added some additional functionality and improved stability from some of the problems that might have plagued earlier DFS implementations.
Most new features are contingent on running your DFS NameSpace in Server 2008 mode which means all servers are Windows Server 2008 AND the domain is running at Server 2008 domain functional level.
DFS NameSpaces Changes in Server 2008:
Access-based Enumeration –
Users are only allowed to see files and folders that they have access to through permissions.
This feature requires either a standalone Server 2008 NameSpace or a domain based NameSpace running in 2008 domain functional level. It is not enabled by default and has to be activated through the following command line:
dfsutil property abde enable \\‹namespace_root›
Search within the DFS NameSpace – Windows Server 2008 has the ability to run a search through the NameSpace and target folders.
Convenient if you want to do a targeted search across all the documents in the NameSpace instead of having to attach to each server.
Install DFS Role on Windows Server 2008
Now that we know more than we probably wanted to about Windows Server 2008 DFS NameSpaces let’s go ahead and run through installing the role on a server. For our example I am using a Windows Server 2008 Domain Controller running Active Directory DS at the Server 2008 functional level.
1.Open Server Manager.
2.Go to Roles in the left pane, then click Add Roles in the center pane.

3.Select File Services from the list of roles.
You will see a short description of what the File Services role provides in the upper right corner in case you needed it. Click Next when done.

4.Now you will get an Introduction to File Services information screen; read through it and move on by clicking Next.

5.In Select Service Roles you can click on Distributed File System and it should also place a check next to DFS Namespaces & DFS Replication; after this click Next.
NOTE: At the bottom you will see Windows Server 2003 File Services and File Replication Service. You would only choose this if you were going to be synchronizing the 2008 server with old servers using the FRS service.

6.On the Create a DFS Namespace screen you can choose to create a namespace now or later.
For this tutorial I am going to create one later as I will have another article going into greater details. So I am going to choose Create a namespace later using the DFS Management snap-in in Server Manager and then click Next.

7.The next screen allows you to confirm your installation selections, so review and then click Install.

8.After a short interval of loading you will see the Installation Results screen which will hopefully have Installation succeeded in the top right. Go ahead and click Close.

9.In Server Manager you should now see File Services and under the Role Services you will see the installed components:
Distributed File System
DFS Namespaces
DFS Replication
DFS Namespaces
DFS Replication

Now that you have DFS installed the next step is to create a namespace and configure replication. I will be covering these in my next article.
Configure DFS NameSpace on Windows Server 2008
The DFS NameSpace will be the client facing aspect of DFS and what really makes life easier for the end users. Having a common namespace across your enterprise for the users to share files will cut down on support calls and make collaboration on documents a breeze.
Let’s go ahead and configure a DFS Namespace through the DFS Management MMC Snap-In.
1.Open DFS Management Snap-in.


3. In the New Namespace Wizard, the first thing it wants to see is your server that will host the Namespace. In this case it will be the domain controller that I installed DFS on, so let’s go ahead and enter that name in TESTDOMAIN and then click Next.

Notice when you type in the name the Edit Settings button becomes live. This is because the wizard will create the shared folder. You can modify the settings it uses at this time by clicking Edit Settings.

Local path of share folder
Shared folder permissions
I am going to go with Administrators have full access; Other users have read and write permissions. If you select Custom you can choose specific groups and users and give them specific rights. Click Ok when you are done choosing permissions, then click Next.

6. Next comes the Namespace Type, there are two choices: Domain-based namespace or Stand-alone namespace. There are some big difference between the two so let’s take a quick look at them now:
- Domain-based namespace – Stored on one or more servers and in Active Directory Domain Services. Increased scalability and access-based enumeration when used in Server 2008 mode.
- Stand-alone namespace – It is stored only on a single namespace server, for redundancy you have to use a failover cluster.

7. The next screen lets you review the choices you just made, if they are correct go ahead and click Create.

8. Next you will see a screen telling you that the namespace is being created. After a few minutes you should see the status of Success, and then click Ok.

9. Now in DFS Management Snap-in you can see the Namespace we just created.

10. Let’s go ahead and quickly create a folder. Right click on the namespace and click New Folder.

Below the Name field you will see a space that shows you a preview of the Namespace with this new folder. Also under that you will see Folder Targets. This allows you to point this folder at a shared folder already on your network.
That way you don’t have to migrate files over, but be warned; if you setup these target folders there is no replication, so if that share goes down for any reason users will not be able to access that data. Go ahead and click Ok.

12 You will now see in the DFS Management Snap-in Folder1 under the namespace we just created.

Configure DFS Replication on Windows Server 2008
Ok now that we have a Namespace configured and we have placed a folder in that namespace let’s setup replication with another server in the domain to make sure that users can always get their data and we don’t get any complaints!
1. Open DFS Management Snap-in.
2. In the left pane go ahead and right click on Replication and then left click on New Replication Group.
 3. Your first choice is: if you want a Multipurpose replication group or Replication group for data collection.
In most cases you will want the Multipurpose replication group, but in some cases where you wanted to grab data from a remote server and bring it to a centralized backup server the group collection would help. In our case we are going to use Multipurpose replication group, and click Next.


 9. Now we can setup the folders we want to replicate to the other server.
Click Add and you will be prompted for the folders information. In this case I am going to choose to replicate the folder we used in the last example Folder1. Note that you can always change permissions on the replication target by selecting Custom Permissions, or you can leave them as is by leaving it at Existing Permissions.
I am going to enter all the info, click Ok and then click Next as that is the only folder I am replicating.

 10. Next you must set the local path for the replicated folder on the other server. It is by default disabled, so highlight the partner server and click Edit. Select Enable and then browse and you can navigate to a folder you have already created or create one in the desired location.
After you’re done you can click Ok, and if that is your only partner server click Next.


 12. After that you will see a popup window telling you:
"Replication will not begin until the configuration is picked up by the members of the replication group. The amount of time this takes depends on Active Directory Domain Services replication latency as well as the polling interval".
Basically the meaning of this is that if you specified remote servers in different sites, you will have to wait until Active Directory replicates the data out with their next sync. Click Ok to get passed this.
 Now that we have configured the namespace and setup replication let’s take a look at how it would be used by our ever grateful end users.
1. Click start.
2. Type in the domain and namespace, in our case it was \\ADExample.com\Sharedfiles and hit Enter.


2. In the left pane go ahead and right click on Replication and then left click on New Replication Group.

In most cases you will want the Multipurpose replication group, but in some cases where you wanted to grab data from a remote server and bring it to a centralized backup server the group collection would help. In our case we are going to use Multipurpose replication group, and click Next.

4. Next we are going to set the name of the replication group; the only limit is that the group must be unique for the domain it servers. In our case let’s use testrep for the group name. After typing it in click Next.

5. Next we are going to add the group members. Click Add and enter the name of the servers that are going to be members of this group. In my case it is going to be TSTest and TESTDOMAIN; after they are entered click Next.

6. In the next page we are going to choose the Topology for the group. Since we only have two servers we will be defaulted to Full Mesh which will work in this example. On this page you will also see an explanation of the other topologies if you need them. Click Next.

7. Replication Schedule is next on the list to configure. There are A LOT of option here for every bandwidth budget and the ability to limit it to certain days and times. I am going to leave the default since we are just in my virtual lab, but you may need different settings based on your server locations and connections. Once set, click Next.

8. Primary member is now the next thing to be set. This is to set the authoritative member for the INITIAL replication. In our case we will use TESTDOMAIN, and then click Next.

Click Add and you will be prompted for the folders information. In this case I am going to choose to replicate the folder we used in the last example Folder1. Note that you can always change permissions on the replication target by selecting Custom Permissions, or you can leave them as is by leaving it at Existing Permissions.
I am going to enter all the info, click Ok and then click Next as that is the only folder I am replicating.


After you’re done you can click Ok, and if that is your only partner server click Next.


11. Next you can review your settings and then click Create; after a few seconds you should go to a Confirmation page where you will see a success messages for each step. After review click Close.


"Replication will not begin until the configuration is picked up by the members of the replication group. The amount of time this takes depends on Active Directory Domain Services replication latency as well as the polling interval".
Basically the meaning of this is that if you specified remote servers in different sites, you will have to wait until Active Directory replicates the data out with their next sync. Click Ok to get passed this.

1. Click start.
2. Type in the domain and namespace, in our case it was \\ADExample.com\Sharedfiles and hit Enter.
3. You should get an explorer window with the Folder1 in the center pane.

Remember this has been the very basic structure of DFS and depending on your need and environment you can create very robust namespaces and replication.
Tag :
Windows